
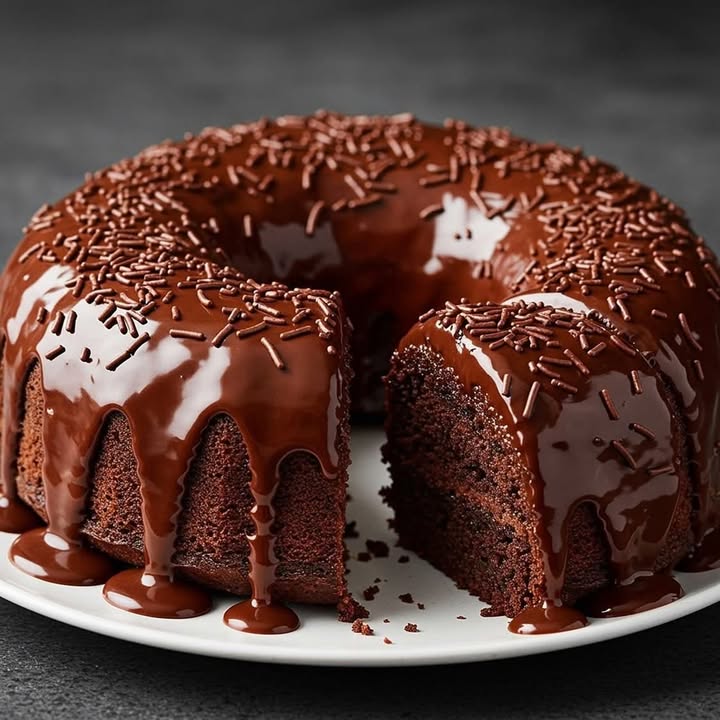
The Ultimate Homemade Chocolate Cake with Wet Ganache
Is there anything better than the smell of chocolate cake baking in the oven? It hits you like a hug. My kids call it ‘the happy smell’. This cake recipe is my absolute go-to. It’s everything you dream of: moist, rich, and topped with a slick, shiny, **intensely dark ganache** that pours over the top like a chocolate waterfall. It’s the king of all my Decadent Chocolate Ganache desserts.
A Cake Born from a Chocolate Emergency
This cake has a history in my kitchen. It started years ago when I promised a chocolate cake for a friend’s last-minute birthday party. I panicked! I grabbed my basic ingredients and made this simple batter. The hot coffee trick was a gamble. But it created the deepest chocolate flavor I’d ever tasted. Now, it’s my most requested recipe. It’s a modern classic in my home, replacing any box mix forever.
Why You’ll Love This Decadent Chocolate Cake
You’ll love it because it’s foolproof. The batter is thin, so don’t worry! It bakes into a super moist cake. The ganache is pure magic with just two ingredients. It turns a simple cake into a stunning showstopper. The taste is deep and complex, not just sweet. It feels luxurious but is surprisingly easy to make. It’s the perfect balance of simple and spectacular.
The Perfect Occasions for This Ganache-Covered Cake
This cake is your best friend for celebrations. It’s perfect for birthdays, of course. It’s also ideal for Sunday family dinners. Bring it to a potluck and you’ll be famous. It makes a cozy treat for a rainy afternoon. Valentine’s Day? Absolutely. Any day you need a guaranteed smile, this cake is your answer.
Gather Your Ingredients
Let’s check the pantry! Simple ingredients make a magnificent cake.
For the Cake:
- 2 cups all-purpose flour (250g)
- 1 cup granulated sugar (200g)
- 3/4 cup unsweetened cocoa powder (75g)
- 1 teaspoon baking powder
- 1 teaspoon baking soda
- 1 pinch of salt
- 2 large eggs
- 1 cup milk (240ml)
- 1/2 cup vegetable oil (120ml)
- 2 teaspoons vanilla extract
- 1 cup hot water or hot coffee (240ml)
For the Wet Ganache:
- 200g chocolate for melting (bars or chips)
- 200ml heavy cream
- 1 teaspoon butter (optional, for extra shine)
Smart Substitution Options
Don’t stress if you’re missing something! Here are easy swaps:
- Oil: Canola or melted coconut oil work well.
- Milk: Any milk you have – whole, skim, or even almond milk.
- Hot Coffee: Use hot water if you don’t have coffee. The coffee just boosts the chocolate flavor without tasting like coffee.
- Cream for Ganache: Full-fat coconut cream can be a dairy-free alternative.
- Chocolate: Use semi-sweet or dark chocolate chips if you don’t have baking bars.
Your Step-by-Step Journey to Chocolate Heaven
Step 1: Oven Prep and Pan Ready
First, get your oven humming at 350°F (180°C). This cake loves a steady, medium heat. Grab your favorite cake pan—a 9-inch round or square is perfect. Give it a light spray or brush with oil, then dust with a bit of flour or cocoa. This little coat helps your beautiful cake slide out easily after baking. No sticking allowed!
Step 2: Mix the Dry Dream Team
In a large bowl, whisk together your flour, cocoa, baking powder, baking soda, salt, and sugar. Watch the colors mix—the dark cocoa with the white flour. It’s like a storm cloud of chocolate promise. Whisking well here avoids lumps later and ensures everything rises evenly. Pro tip: Sift your cocoa if it seems a bit lumpy for a super smooth texture.
Step 3: Bring in the Wet Squad
Now, pour in the eggs, milk, vegetable oil, and vanilla. Stir with a spatula or whisk until it’s just combined. The batter will be thick and gorgeous, like a dark, fudgy pudding. Don’t overmix! Just get it smooth. You’ll smell the vanilla mingling with the cocoa. It’s already heavenly.
Step 4: The Secret Hot Liquid Trick
Here’s the magic step. Slowly pour in the hot water or hot coffee. Add it gradually while stirring. The batter will become surprisingly thin and liquid. Don’t panic! This is exactly right. The hot liquid ‘blooms’ the cocoa, unlocking its deepest flavor. It creates the moistest cake texture imaginable. Pour this liquid batter into your prepared pan.
Step 5: Bake, Cool, and Anticipate
Slide the pan into your preheated oven. Bake for 30-35 minutes. You’ll know it’s done when the top is springy and a toothpick comes out with just a few moist crumbs. Let the cake cool in the pan for 10 minutes. Then, gently turn it out onto a wire rack to cool completely. This stops it from steaming itself and getting soggy.
Step 6: Create the Wet, Bright Ganache
While the cake cools, make the crown: the **Decadent Chocolate Ganache**. Chop your chocolate finely. Heat the cream until it just starts to simmer around the edges. Pour the hot cream over the chopped chocolate. Let it sit for 2-3 minutes—let the heat do its work. Then, stir slowly from the center outwards until you have a silky, glossy, perfect pool of chocolate. If you want extra shine, stir in that optional teaspoon of butter.
Step 7: The Grand Finale: Drenching Your Cake
Place your cooled cake on a plate or stand. Pour the warm ganache right over the center. Let it flow naturally, spilling over the edges and down the sides in beautiful drips. Don’t try to control it too much! That rustic, glossy cover is what makes it **wet and intense**. Add sprinkles, berries, or just leave it pure and dark. Chef’s tip: Let the ganache cool slightly for a thicker coating, or use it warm for a super thin, shiny glaze.
Time Investment for Chocolate Bliss
| Prep Time | 20 minutes |
| Baking Time | 35 minutes |
| Cooling Time | 1 hour |
| Ganache & Decoration | 15 minutes |
| Total Time | About 1 hour 50 minutes |
Chef’s Secret: The Coffee Boost
The secret superstar is the hot coffee. It doesn’t make the cake taste like coffee. Instead, it amplifies the chocolate flavor, making it richer and less sweet. It’s like turning the volume up on cocoa. If you’re wary, try it with hot water first. But next time, be brave and use coffee. You’ll taste the difference.
A Fun Chocolate Fact
Did you know ganache is a French word? It means a smooth mixture of chocolate and cream. It’s the heart of many professional desserts. Your simple version at home is just as luxurious. Using good quality chocolate truly makes a difference in its shine and taste.
Necessary Equipment
- 9-inch round or square cake pan
- Large mixing bowl
- Whisk or mixing spatula
- Measuring cups and spoons
- Small saucepan for cream
- Wire cooling rack
How to Store Your Chocolate Ganache Cake
If you need to store the cake, the ganache acts as a lovely seal. Cover the cake loosely with plastic wrap or place it in a cake carrier. Keep it at room temperature for up to 2 days if your kitchen isn’t too warm.
For longer storage, the refrigerator is best. The cool air will firm up the ganache to a fudgy texture. Let the cake sit in an airtight container. It will stay delicious for up to 5 days.
You can also freeze this cake. Wrap the whole cake or slices tightly in plastic wrap, then in foil. Freeze for up to 3 months. Thaw overnight in the fridge. The texture remains wonderfully moist because freezing is a gentle form of preservation that locks in moisture.
Tips and Advice for a Perfect Cake
- Use room temperature eggs and milk for easier mixing.
- Don’t overbake! Check at 30 minutes. A few moist crumbs on the tester are good.
- For a super smooth ganache, chop your chocolate very finely.
- Let the cake cool completely before ganaching. Warm cake will melt the ganache too much.
- Experiment with different chocolates: dark for intensity, semi-sweet for balance.
Presentation Ideas to Wow Your Guests
- Top with fresh red berries like raspberries for a pop of color.
- Dust with edible gold flakes for a celebratory touch.
- Add a sprinkle of sea salt flakes on the ganache for a trendy bitter-sweet bite.
- Serve with a dollop of whipped cream or a scoop of vanilla ice cream.
- Use a cake stand and a pretty cake server for your special occasion.
Healthier and Fun Variations
Love this cake but want to tweak it? Here are six delicious spins you can try.
- Gluten-Free Chocolate Cake: Swap the all-purpose flour for a gluten-free blend. Ensure your cocoa and other ingredients are gluten-free certified.
- Vegan Chocolate Cake: Use plant-based milk, replace eggs with 1/2 cup applesauce or commercial egg replacer, and use coconut oil. For the ganache, use vegan chocolate and full-fat coconut cream.
- Sugar-Free Chocolate Cake: Replace granulated sugar with a monk fruit or erythritol blend designed for baking. Check that your chocolate for ganache is also sugar-free.
- Chocolate Orange Cake: Add the zest of one orange to the cake batter and replace the vanilla with 1 teaspoon of orange extract. A bright, citrusy twist!
- Mocha Espresso Cake: Use strong hot espresso instead of coffee in the batter. Add 1 teaspoon of instant espresso powder to the dry ingredients for a true mocha kick.
- Chocolate Raspberry Cake: After pouring the ganache, immediately press fresh raspberries into the top. The juicy berries complement the dark chocolate perfectly, similar to the pairing in a gorgeous White Chocolate Raspberry Tiramisu.
For more fruit-based dessert inspiration, check out our simple Baked Pears with Cinnamon or a cozy Healthy Apple Oat Crumble. If you love creamy textures, our Coconut Chia Dessert is a must-try.
Common Mistakes to Avoid
Mistake 1: Panicking Over the Thin Batter
Many bakers get worried when they add the hot liquid. The batter becomes very runny. They think something went wrong. This is actually the key to a moist cake! The thin batter allows the cake to bake with a lighter, more tender structure. Trust the process. Pour it into the pan and bake. You’ll get a perfect cake, not a soup.
Mistake 2: Overbaking the Cake
Because the batter is thin, people often bake it longer, thinking it needs to ‘set’ more. Overbaking is the main cause of a dry chocolate cake. Set your timer for 30 minutes. Check with a toothpick. It should come out with a few sticky crumbs, not completely clean. The cake continues to set as it cools. Pro tip: An oven thermometer ensures your temperature is accurate.
Mistake 3: Ganache that Turns Grainy or Separates
This happens if the cream is too hot or you stir too aggressively. If the cream is boiling, it can scorch the chocolate. If you stir before letting the chocolate melt, you get a grainy mix. Heat cream until it’s just steaming. Pour it over the chocolate. Let it sit for 2-3 minutes untouched. Then stir gently from the center. This makes a silky, homogeneous ganache.
Mistake 4: Putting Ganache on a Warm Cake
The excitement to finish the cake is real. But pouring glorious ganache on a warm cake is a disaster. The warm cake will absorb the ganache, making it dull and sticky. It might even melt completely and slide off. Let your cake cool completely on a rack. Patience gives you that beautiful, shiny, **wet ganache** cover that defines this dessert.
Frequently Asked Questions
Can I make this cake without coffee?
Absolutely! You can use hot water instead of hot coffee with no problem. The cake will still be deliciously moist and chocolatey. The coffee simply deepens the chocolate flavor without adding a coffee taste. It’s a flavor enhancer. If you don’t like or have coffee, hot water works perfectly fine. The recipe is very forgiving.
What type of chocolate is best for the ganache?
For a **Decadent Chocolate Ganache**, use a good quality chocolate bar meant for baking. Semi-sweet (around 50-60% cocoa) is a great balanced choice. Dark chocolate (70%+) gives a more intense, less sweet finish. You can also use good quality chocolate chips. Avoid candy-coated chips. The better the chocolate, the glossier and richer your ganache will be.
Why do I need to use hot liquid in the batter?
The hot water or coffee does two amazing things. First, it ‘blooms’ the cocoa powder. Blooming means it opens up the cocoa’s flavor, making it taste stronger and richer. Second, the hot liquid helps dissolve the sugar and other dry ingredients completely. This creates a smoother batter. It also starts the cooking process, leading to a very moist final cake.
Can I make this recipe into cupcakes?
Yes, this recipe adapts beautifully to cupcakes. Fill lined cupcake tins about 2/3 full with the batter. Bake at the same temperature (350°F) for about 18-22 minutes. Check them early. Cool completely before topping with ganache. You’ll get about 18-24 gorgeous, moist cupcakes with that same incredible chocolate flavor.
How can I fix my ganache if it’s too thick or too thin?
Ganache thickness depends on temperature and ratio. If it’s too thick and stiff, gently warm it for 5-10 seconds in the microwave or add a tiny splash of warm cream and stir. If it’s too thin and runny, let it cool at room temperature for 10-15 minutes. It will thicken as it cools. You can also chill it briefly in the fridge, but stir often to keep it smooth.
Do I need to use the optional butter in the ganache?
The teaspoon of butter is optional but helpful. It adds an extra layer of richness to the flavor. It also can give the ganache a slightly shinier finish. If you want a pure, straightforward ganache, skip it. If you want a little extra luxury and a glossier pour, include it. It’s a small touch that makes a noticeable difference.
How do I know my cake is done baking without a toothpick?
If you don’t have a toothpick, use a thin knife or a skewer. Insert it into the center of the cake. Pull it out. It should have a few moist crumbs clinging to it, not wet batter. Also, the top of the cake will look set. The edges might just start to pull away from the pan sides. The cake should spring back slightly when you gently press the center.
Can I add other flavors to the cake batter?
You can! Add a teaspoon of instant espresso powder for a mocha hint. Add a tablespoon of orange or lemon zest for a citrus twist. A pinch of cinnamon or chili powder can add a warm, spicy note. Keep additions small so they complement, not overwhelm, the chocolate. The base recipe is a perfect canvas for subtle flavor plays.
What’s the best way to pour the ganache for a smooth top?
Pour the ganache from the center of the cooled cake. Let it flow outwards naturally. Use a spoon or spatula to guide it over the edges if needed. Don’t spread it like frosting. Let gravity create the beautiful drips. For a perfectly smooth top, make sure your cake is on a flat, level surface before you start pouring.
How long can I store this chocolate cake?
At room temperature, covered, it lasts 2 days. In the refrigerator, in an airtight container, it lasts 5 days. The ganache will firm up but stays delicious. You can freeze the whole cake or slices for up to 3 months. Wrap tightly in plastic, then foil. Thaw in the fridge overnight. This cake is a great make-ahead treat for events.
This cake is a cornerstone of my home baking, and I hope it becomes yours too. For countless more sweet inspirations, explore all our creations in the dessert category on the site.
Your Next Chocolate Adventure Starts Now
So, are you ready to make this cake? It’s a recipe that promises joy. The process is simple, the result is stunning, and the taste is pure chocolate comfort. Share it with friends, celebrate a Tuesday, or just treat yourself. That glossy, **wet ganache** is your reward. Real chocolate lover? Comment “Give me that cake!” and save this recipe. Your next whim deserves this homemade chocolate dream.
Decadent Chocolate Ganache
Ingredients
Equipment
Method
- Preheat the oven to 350°F (180°C) and prepare your cake pan with oil and flour.
- In a large bowl, whisk together flour, cocoa powder, baking powder, baking soda, salt, and sugar.
- Add eggs, milk, vegetable oil, and vanilla to the dry ingredients and mix until just combined.
- Gradually add hot water or coffee while stirring to create a thin batter.
- Pour the batter into the prepared pan and bake for 30-35 minutes until done.
- Let the cake cool in the pan for 10 minutes, then transfer to a wire rack to cool completely.
- Chop the chocolate finely and heat the cream until simmering; pour cream over chocolate and let sit for 2-3 minutes before stirring until smooth.
- Pour the ganache over the cooled cake, allowing it to drip naturally over the edges.