
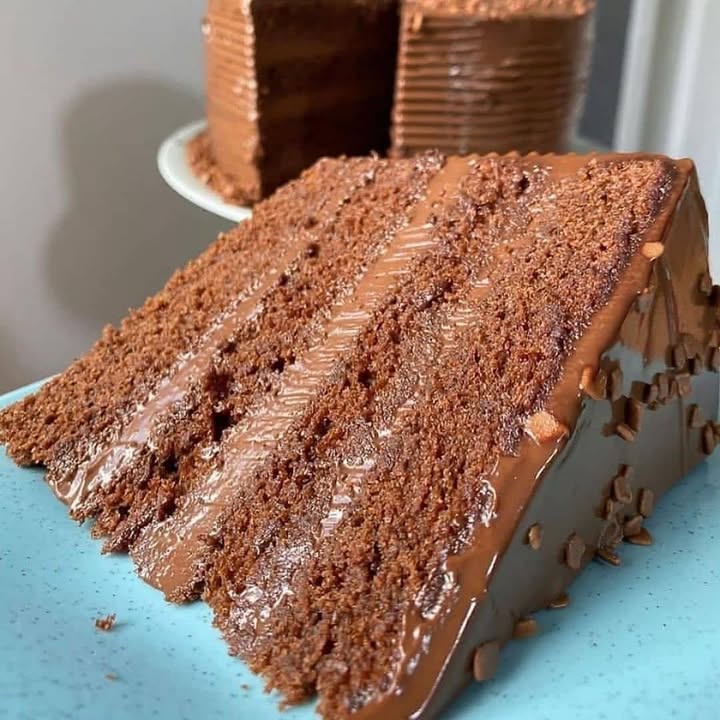
A Sweet Journey with Dulce de Leche Cake
Imagine a warm, cozy kitchen filled with the sweet aroma of Dulce de Leche Cake. This delightful dessert is not just a treat; it’s a comforting hug in cake form. Every bite is a blend of rich, creamy dulce de leche and a soft, fluffy biscuit that melts in your mouth. Let me share with you why this cake is so special and how to make it at home.
The Rich History of Dulce de Leche Cake
Dulce de Leche Cake has a delicious history rooted in South American cuisine. It’s a traditional treat that has been adapted and loved across continents. The modern version often includes a luscious layer of dulce de leche, which is nothing but caramelized condensed milk. In my family, we’ve been making this cake for generations, and each time, it’s a celebration of love and tradition.
Why You’ll Love This Dulce de Leche Cake
This cake is a winner for its simplicity and incredible flavor. The combination of a light, spongy biscuit base and the rich, creamy dulce de leche is heavenly. It’s perfect for those who love a touch of sweetness without the complexity of a layered cake. Plus, it’s a great way to use up that can of condensed milk you might have in your pantry.
Perfect Occasions to Prepare This Delightful Cake
Whether it’s a birthday, a casual get-together, or a Sunday afternoon treat, this Dulce de Leche Cake is always a hit. I love making it for family gatherings, where everyone gathers around the table, savoring each bite and sharing stories. It’s also a fantastic choice for a potluck, as it’s easy to transport and always a crowd-pleaser.
Ingredients You’ll Need
- 1 kg of flour with leavening agent
- 1 kg of sugar
- 500 g of margarine
- 1 liter of milk
- 10 eggs
- 10 drops of cream essence
- 1 teaspoon vanilla extract
- Lemon zest
- 1 can of condensed milk
Substitution Options
- Flour: You can use all-purpose flour with baking powder if you don’t have self-rising flour.
- Margarine: Butter works well as a substitute if you prefer a richer flavor.
- Cream essence: Vanilla extract can be used in place of cream essence for a more subtle flavor.
Preparation: Step-by-Step Guide
Step 1: Cream the Margarine, Eggs, Lemon Zest, and Sugar
In a large mixing bowl, beat the margarine, eggs, lemon zest, and sugar until the mixture is light and creamy. The lemon zest adds a fresh, zesty note, making the batter aromatic and inviting. Pro tip: Make sure the margarine is at room temperature for easier mixing.
Step 2: Add the Cream and Vanilla Essence
Next, add the cream and vanilla essence to the mixture, and continue beating until everything is well combined. The creamy texture and vanilla aroma will fill your kitchen, making it smell like a bakery. Chef’s tip: For a deeper flavor, scrape the seeds from a vanilla bean pod instead of using extract.
Step 3: Fold in the Flour and Milk
Fold in the flour and milk with a wooden spoon, alternating between the two. This step helps to keep the batter smooth and prevents overmixing, which can make the cake tough. The batter should be thick and slightly lumpy, but that’s what makes it perfectly spongy. Pro tip: Sift the flour to avoid any lumps, and add the milk gradually to achieve the right consistency.
Step 4: Bake the Biscuit
Pour the batter into a previously floured and buttered mold. Bake at 250°C (482°F) for about 45 minutes, or until a toothpick inserted into the center comes out clean. The golden-brown top and the rising aroma will tell you when it’s done. Chef’s tip: If the top is browning too quickly, cover it loosely with aluminum foil to prevent burning.
Step 5: Prepare the Dulce de Leche
While the cake is baking, prepare the dulce de leche. Place the can of condensed milk in a bain-marie (a water bath) and let it simmer for 2 hours. Once it cools, open the can, and you’ll find a rich, caramelized delight. Pro tip: Make sure the can is completely submerged in the water to avoid any hot spots.
Step 6: Decorate the Cake
Once the cake is cooled, spread the dulce de leche over the top. You can create swirls and patterns with a spatula for a beautiful finish. The gooey, caramel-like dulce de leche adds a luxurious touch to the simple yet delicious cake. Enjoy the process; it’s part of the fun!
Timing
Prep Time: 20 minutes
Cooking Time: 45-50 minutes
Bain-Marie Time: 2 hours
Total Time: About 3 hours 10 minutes
Chef’s Secret
To make the cake extra moist and flavorful, brush the top with a simple syrup made from equal parts sugar and water before adding the dulce de leche. This little trick will keep the cake tender and enhance the overall taste.
Extra Info
Dulce de leche is not just a topping; it’s a versatile ingredient. You can use it in ice creams, pies, and even as a spread on toast. Its rich, caramel-like flavor is a real treat for the senses.
Necessary Equipment
- Large mixing bowl
- Wooden spoon
- Egg beater or electric mixer
- Baking mold
- Bain-marie setup (pot and water)
Storage
Store the Dulce de Leche Cake in an airtight container to keep it fresh. It can stay at room temperature for up to 2 days. If you need to store it longer, place it in the refrigerator, where it will last for about a week. To serve, bring it to room temperature for the best texture and flavor. The cake tastes even better the next day, as the flavors meld together.
Tips and Advice
- Room Temperature Ingredients: Make sure all ingredients are at room temperature for better mixing and a smoother batter.
- Oven Preheating: Always preheat your oven to ensure even baking. A well-preheated oven is key to a perfect cake.
- Check Doneness: Use a toothpick to check if the cake is done. Insert it into the center; if it comes out clean, the cake is ready.
Presentation Tips
- Sprinkle some powdered sugar on top for a elegant look.
- Add a few fresh berries or a dollop of whipped cream for a pop of color and extra flavor.
- Create a pattern with the dulce de leche using a piping bag for a professional touch.
Healthier Alternative Recipes
If you’re looking for a healthier twist on this classic, here are six possible variations:
- Gluten-Free Version: Replace the regular flour with gluten-free flour. This way, everyone can enjoy the cake, even those with dietary restrictions.
- Low-Sugar Version: Use a sugar substitute like stevia or erythritol to reduce the sugar content while still enjoying the sweet goodness.
- Whole Wheat Version: Substitute half of the regular flour with whole wheat flour for a nuttier, more wholesome taste.
- Vegan Version: Use plant-based margarine and a vegan egg substitute like applesauce or flax eggs. Swap the condensed milk for a vegan dulce de leche made from coconut milk.
- Zested Version: Add a variety of citrus zest, like orange or lime, for a refreshing twist on the classic flavor.
- Spiced Version: Add a pinch of cinnamon, nutmeg, or cardamom to the batter for a warm, spiced flavor that’s perfect for fall.
If you’re in the mood for more sweet treats, check out our Dreamy Chocolate Custard or Delicious Marble Cake. These recipes are sure to satisfy your sweet tooth.
Common Mistakes to Avoid
Mistake 1: Overmixing the Batter
Overmixing the batter can lead to a tough, dense cake. Mix the ingredients just until they are combined. The batter should be smooth but still slightly lumpy. Pro tip: Use a gentle folding motion with a wooden spoon to incorporate the flour and milk.
Mistake 2: Not Preheating the Oven
Placing the cake in an unpreheated oven can result in uneven baking. Always preheat your oven to the specified temperature. This ensures that the cake bakes evenly and rises properly. Pro tip: Use an oven thermometer to check the accuracy of your oven’s temperature.
Mistake 3: Opening the Oven Door Too Early
Opening the oven door too early can cause the cake to sink. Resist the temptation to peek until the cake is almost done. The sudden change in temperature can cause the cake to collapse. Pro tip: Use the oven light to check the cake’s progress without opening the door.
Mistake 4: Not Cooling the Cake Before Adding Dulce de Leche
Adding the dulce de leche to a warm cake will make it runny and uneven. Allow the cake to cool completely before spreading the dulce de leche. This ensures that the topping stays in place and creates a beautiful, even layer. Pro tip: You can speed up the cooling process by placing the cake in the refrigerator for a short time.
Mistake 5: Overbaking the Cake
Overbaking can make the cake dry and crumbly. Start checking the cake a few minutes before the recommended baking time. If a toothpick inserted into the center comes out clean, the cake is done. Pro tip: Cover the cake loosely with aluminum foil if the top is browning too quickly.
FAQ
Can I use butter instead of margarine?
Yes, you can use butter instead of margarine. Butter will give the cake a richer, more indulgent flavor. However, keep in mind that butter has a higher fat content, which may slightly alter the texture of the cake.
What can I use if I don’t have cream essence?
If you don’t have cream essence, you can use vanilla extract as a substitute. The flavor will be slightly different, but the cake will still be delicious. For a more authentic flavor, consider scraping the seeds from a vanilla bean pod.
Can I make the dulce de leche ahead of time?
Absolutely! The dulce de leche can be made several days in advance. Simply store it in an airtight container in the refrigerator. When you’re ready to use it, let it come to room temperature or gently heat it in a microwave to soften it.
How do I know when the cake is done?
To check if the cake is done, insert a toothpick into the center. If it comes out clean, the cake is ready. If there is wet batter on the toothpick, bake the cake for a few more minutes and check again.
Can I use a different type of milk?
Yes, you can use different types of milk, such as almond milk, soy milk, or oat milk. Just be aware that the cake’s texture and flavor may vary slightly depending on the milk you choose. Cow’s milk generally provides the most traditional and familiar taste.
Is this cake suitable for people with lactose intolerance?
Traditional dulce de leche and milk in this recipe contain lactose. If you or someone you are baking for has lactose intolerance, you can use lactose-free milk and a lactose-free alternative to dulce de leche, such as a condensed coconut milk version. This way, everyone can enjoy the cake without discomfort.
Can I make this cake in a bundt pan?
Yes, you can make this cake in a bundt pan. Just make sure to grease the pan thoroughly and adjust the baking time if necessary. A bundt pan will give the cake a beautiful, unique shape, perfect for a special occasion. Just remember to check the cake’s doneness with a toothpick.
Why is my cake not rising?
There could be a few reasons why your cake is not rising. Make sure your leavening agent (baking powder or self-rising flour) is fresh and active. Also, ensure that the eggs are at room temperature and that you are not overmixing the batter. Overmixing can cause the gluten to develop too much, resulting in a dense cake.
Can I freeze the cake?
Yes, you can freeze the cake, but it’s best to do so before adding the dulce de leche. Wrap the cooled cake in plastic wrap and then in aluminum foil. Store it in the freezer for up to 2 months. When you’re ready to serve, thaw the cake at room temperature, then add the dulce de leche topping.
What is the best way to store the leftover cake?
Store the leftover cake in an airtight container at room temperature for up to 2 days. If you need to store it longer, place it in the refrigerator, where it will last for about a week. For the best texture, bring the cake to room temperature before serving. The flavors will meld and the cake will be even more delicious the next day.
Enjoy this delectable Dulce de Leche Cake, and don’t forget to explore our other delicious dessert recipes for more sweet treats. Whether you’re baking for a special occasion or just because, this cake is sure to bring joy and warmth to your table. Happy baking!
Dulce de Leche Cake
Ingredients
Equipment
Method
- In a large mixing bowl, beat the margarine, eggs, lemon zest, and sugar until light and creamy.
- Add the cream and vanilla essence to the mixture, and continue beating until combined.
- Fold in the flour and milk alternately using a wooden spoon until the batter is smooth but slightly lumpy.
- Pour the batter into a floured and buttered mold and bake at 250°C (482°F) for about 45 minutes, or until a toothpick comes out clean.
- While the cake is baking, prepare the dulce de leche by simmering a can of condensed milk in a bain-marie for 2 hours.
- Once the cake cools, spread the dulce de leche over the top and decorate as desired.