
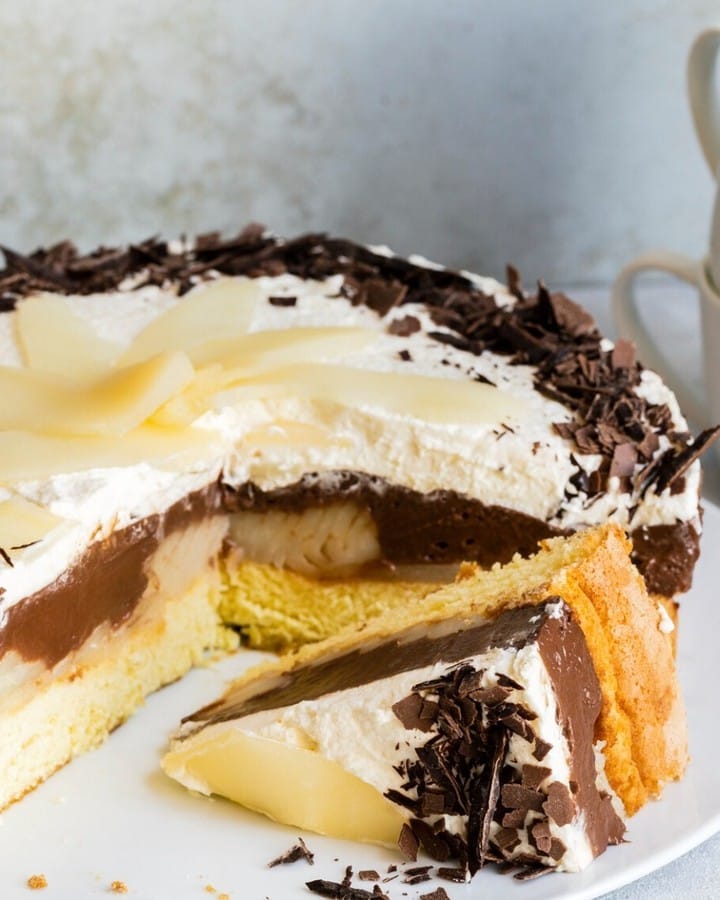
A Sumptuous Pear Helene Delight for Your Next Gathering
Imagine a delightful fusion of rich chocolate, creamy textures, and the sweet, succulent taste of pears. This Pear Helene Delight is a modern twist on the classic French dessert, Poire Belle Hélène. It’s a perfect blend of flavors that will make your taste buds dance with joy. I first tried this recipe at a friend’s birthday, and it was love at first bite! The combination of the light sponge cake, the rich chocolate cream, and the juicy pear slices is simply irresistible.
A Brief History: From Classic to Modern Pear Helene Delight
The traditional Poire Belle Hélène, named after the opera by Offenbach, dates back to the 1860s. It originally featured poached pears, vanilla ice cream, and warm chocolate sauce. Over the years, creative chefs have reinvented this classic, adding their own twists. My version uses a fluffy sponge cake as the base, making it a little more special and easier to share with friends and family. It’s a wonderful way to honor the past while embracing a new, delicious creation.
Why You’ll Love This Pear Helene Delight Recipe
This Pear Helene Delight is a crowd-pleaser for several reasons. First, it combines the luxurious flavors of chocolate and pears, which are a match made in heaven. The creamy chocolate filling and the fresh, juicy pear slices create a harmonious balance of textures and tastes. Plus, it’s surprisingly simple to make, even for those who aren’t seasoned bakers. The best part? It looks impressive and tastes even better!
Perfect Occasions to Prepare This Pear Helene Delight
Whether you’re hosting a birthday party, a holiday gathering, or just a casual get-together, this Pear Helene Delight is sure to be a hit. It’s elegant enough for a special occasion but also cozy and comforting for a family dinner. I’ve served it at both formal and informal events, and it always receives rave reviews. It’s one of those desserts that people remember and ask for again and again.
Ingredients for Pear Helene Delight
- For the Dough:
- 4 eggs
- 120g sugar
- 1 pack vanilla sugar
- 1 pinch of salt
- 80g flour
- 3 tbsp starch
- For the Filling:
- 1 can of pear (drained weight: 460 g)
- 3 packs of cake icing
- 60g white sugar
- 100 g whole milk couverture
- 100 g dark chocolate couverture
- 400 g cream
- 3 tsp cream stiffener
- 50 g grated dark chocolate to garnish
Substitution Options
If you don’t have all the ingredients on hand, here are some substitutions you can make:
- Cake icing: You can use cornstarch or custard powder mixed with water.
- Couverture: Substitute with high-quality chocolate chips or baking chocolate.
- Dark chocolate: Use semisweet or bittersweet chocolate if you prefer a less intense flavor.
Preparation
Step 1: Prepare the Sponge Cake Base
Begin by separating the eggs. Preheat your oven to 180 degrees (fan oven: 160 degrees). Beat the egg whites with sugar and salt until they form a firm, glossy meringue. Carefully fold in the egg yolks using a spatula. Mix the flour and starch and sift them into the egg mixture. Gently fold everything together with the spatula and pour the batter into a 26 cm springform pan lined with baking paper.
Step 2: Bake and Cool the Sponge Cake
Bake the sponge cake for about 20 minutes or until it turns golden and springs back when touched. Let it cool completely before proceeding. Place a cake ring around the sponge cake to hold the filling. Drain the pears and collect the juice. Slice the pear halves thinly and arrange them over the cake base. The pears add a beautiful, juicy layer that complements the light, airy cake.
Step 3: Make the Chocolate Cream
For the chocolate cream, fill the reserved pear juice with water up to 500 ml and mix it with the cake icing and sugar in a small pot. Heat the liquid slowly while stirring constantly. Once it reaches a boil, add the couverture and melt it into the icing. Stir in 100 g of cream to give the chocolate cream a smooth, rich texture. The aroma of melting chocolate will fill your kitchen, making it hard to resist a little taste test!
Step 4: Assemble and Chill the Cake
Immediately spread the chocolate cream over the pear-covered cake base and refrigerate it for about 2 hours. While the cake chills, beat the remaining cream until it forms stiff peaks and keep it cool. Spread the whipped cream over the cooled chocolate cream, creating a luscious, creamy layer. Garnish the cake with finely chopped chocolate strips. The combination of the chilled chocolate cream and the airy whipped cream is utterly delightful.
Timing
Here’s a breakdown of the preparation times:
- Prep Time: 30 minutes
- Cooking Time: 20 minutes
- Resting Time: 2 hours
- Total Time: 3 hours and 20 minutes
Chef’s Secret
To make the chocolate cream extra silky and smooth, add a teaspoon of butter after melting the couverture. This small touch makes a big difference in the texture and flavor.
Extra Info
Pears are not only delicious but also incredibly versatile. They can be used in both sweet and savory dishes, and their natural sweetness pairs well with a wide range of flavors. If you’re curious about the calorie content of pears, you can check out the USDA FoodData Central for more detailed nutritional information.
Necessary Equipment
- 26 cm springform pan
- Oven
- Spatula
- Mixing bowls
- Whisk or electric mixer
- Small pot
- Baking paper
- Cake ring (optional, for assembly)
Storage
To keep your Pear Helene Delight in its best condition, store it in an airtight container in the refrigerator. It will stay fresh for up to 3 days. If you need to store it longer, you can freeze individual slices. Just wrap them in plastic wrap and place them in a freezer bag. They will last for up to 2 months. When you’re ready to serve, let the slices thaw in the refrigerator overnight.
Tips and Advice
Make sure to use room temperature eggs for the best results in the sponge cake. Room temperature eggs whip up more easily and create a lighter, fluffier texture. Also, be gentle when folding the dry ingredients into the egg mixture to avoid deflating the batter. A light touch will help you achieve a perfect, airy sponge cake.
Presentation Tips
For a stunning presentation, dust the top of the cake with a little cocoa powder or powdered sugar. You can also add a few fresh berries or a sprinkle of edible gold glitter for a touch of elegance. Serve the cake on a pretty plate or a decorative cake stand to make it the centerpiece of your table.
Healthier Alternative Recipes
If you’re looking for healthier or different variations of this recipe, try these options:
- Lighter Version: Use low-fat cream and reduce the amount of sugar in the chocolate cream. You can also opt for a sugar-free cake icing.
- Vegan Option: Replace the eggs with aquafaba, use plant-based cream, and choose vegan-friendly chocolate. You can also use a vegan cake mix for the base.
- Gluten-Free: Use gluten-free flour and starch in the sponge cake. Ensure that all other ingredients are also gluten-free.
For more inspiration, check out these delicious recipes:
- Peach Raspberry Delight: A refreshing and fruity alternative that’s perfect for summer.
- Paçoca Brigadeiro Delight: A Brazilian twist with a nutty and chocolatey flavor.
- Nutella Chocolate Cake: For those who love a rich, indulgent chocolate experience.
- Nutella Banana Brownies: A sweet and chewy treat with a hint of banana.
Common Mistakes to Avoid
Mistake 1: Overbeating the Egg Whites
Overbeating the egg whites can result in a dry, tough sponge cake. To avoid this, stop beating the egg whites when they form stiff, glossy peaks. If you accidentally overbeat them, you can try adding a teaspoon of lemon juice or cream of tartar to help stabilize the mixture.
Mistake 2: Not Lining the Springform Pan
Failing to line the springform pan with baking paper can make it difficult to remove the cake from the pan. Make sure to line the bottom and sides of the pan with parchment paper before pouring in the batter. This will ensure that your cake comes out clean and intact.
Mistake 3: Using Too Much Chocolate in the Cream
Mistake 4: Not Chilling the Cake Long Enough
Chilling the cake for at least 2 hours is crucial to set the layers and make slicing easier. If you don’t chill it long enough, the layers may mix and the cake may become messy. Patience is key, and the extra time in the fridge will make a big difference in the final result.
Mistake 5: Overwhipping the Topping Cream
Overwhipping the cream can lead to a grainy, separated texture. Stop whipping the cream when it forms soft, billowy peaks. If you accidentally overwhip it, you can try adding a little cold milk or a tablespoon of cold cream to bring it back to the right consistency.
FAQ
Can I use fresh pears instead of canned pears?
Yes, you can use fresh pears, but you might need to poach them in a light syrup to soften them slightly. This will also add a bit of extra flavor to the pears. Peel and slice the pears, then poach them in a simple syrup (equal parts water and sugar) for about 10-15 minutes until they are tender.
What can I use if I don’t have cake icing?
If you don’t have cake icing, you can use a mixture of cornstarch and water or custard powder. These alternatives will help thicken the liquid and give it a similar consistency to cake icing. Just whisk them together and add to the liquid as directed in the recipe.
Can I use a different type of chocolate for the filling?
Yes, you can use different types of chocolate, such as white chocolate or milk chocolate, depending on your preference. Just make sure to use high-quality chocolate for the best flavor and texture. You can also mix different types of chocolate to create a unique flavor profile.
How do I make the chocolate cream smoother?
To make the chocolate cream smoother, you can add a small amount of butter or a teaspoon of oil to the melted chocolate. This helps to emulsify the mixture and create a smoother, silkier texture. Be sure to whisk the mixture thoroughly to incorporate the added ingredients.
Can I make this recipe without a springform pan?
Yes, you can use a regular cake pan, but you’ll need to be more careful when removing the cake. Line the pan with parchment paper and grease the sides to make it easier to lift the cake out. You can also use a baking sheet if you prefer a thinner, more delicate cake.
How do I know when the sponge cake is done?
The sponge cake is done when it turns golden brown and springs back when lightly pressed in the center. You can also insert a toothpick into the center of the cake. If it comes out clean, the cake is ready. Be careful not to overbake, as this can make the cake dry and tough.
Can I use whipped cream stabilizer instead of cream stiffener?
Yes, you can use a whipped cream stabilizer if you don’t have cream stiffener. Both products help to keep the whipped cream firm and prevent it from weeping. Follow the instructions on the stabilizer package to ensure the best results. A little goes a long way, so start with a small amount and adjust as needed.
Can I make this recipe ahead of time?
Absolutely! You can prepare the cake up to the point of adding the whipped cream topping and store it in the refrigerator. Add the whipped cream just before serving to keep it fresh and light. This is a great way to save time and still serve a beautifully presented dessert.
What are some good garnishes for this cake?
Some good garnishes for this cake include fresh berries, a dusting of cocoa powder, a sprinkle of powdered sugar, or a few chocolate shavings. You can also add a dollop of whipped cream or a drizzle of caramel sauce for extra flavor and texture. Get creative and have fun with it!
Can I make this recipe dairy-free?
Yes, you can make this recipe dairy-free by using plant-based substitutes. Use a dairy-free cream, such as coconut cream or almond milk, and choose vegan-friendly chocolate. You can also use a dairy-free margarine or coconut oil in place of butter. Just be sure to check the labels to ensure all your ingredients are dairy-free.
Enjoy this delectable Pear Helene Delight, and don’t forget to explore more recipes in our dessert section. Happy baking!
Pear Helene Delight
Ingredients
Equipment
Method
- Preheat the oven to 180 degrees (fan oven: 160 degrees).
- Separate the eggs and beat the egg whites with sugar and salt until firm.
- Fold in the egg yolks gently.
- Mix and sift the flour and starch into the egg mixture, folding carefully.
- Pour the batter into a 26 cm springform pan lined with baking paper.
- Bake for about 20 minutes until golden and springy. Let it cool completely.
- Place a cake ring around the sponge cake. Drain and slice the pears thinly, then arrange them over the cake.
- Combine reserved pear juice with water to make 500 ml and mix with cake icing and sugar in a small pot.
- Heat the mixture slowly while stirring until it boils, then melt in the couverture.
- Stir in 100 g of cream for a smooth texture.
- Spread the chocolate cream over the pear-covered cake base and refrigerate for about 2 hours.
- Whip the remaining cream until stiff peaks form and spread it over the chilled chocolate cream.
- Garnish with grated dark chocolate.