
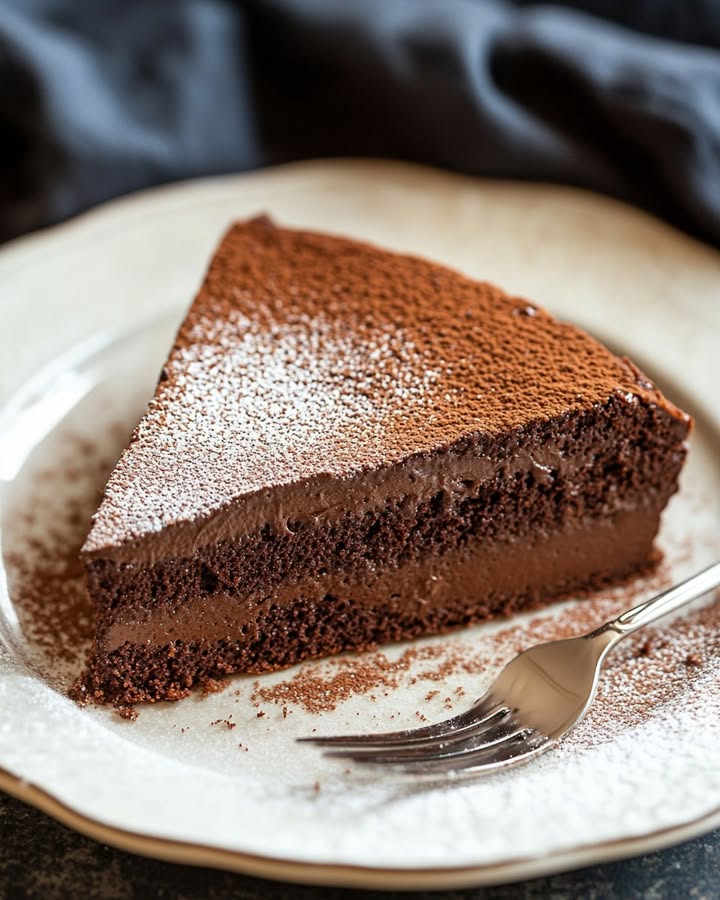
A Magical Dessert to Sweeten Your Dreams: Chocolate Magic Custard Cake
Imagine a luscious, dreamy chocolate custard that magically transforms into three distinct layers in the oven. This Dreamy Chocolate Custard cake is like a sweet embrace, with a rich, fudgy bottom, a creamy custard center, and a light, fluffy top. It’s the perfect treat for any chocolate lover, and it’s surprisingly easy to make!
The Rich History of This Dreamy Treat
This magical cake has its roots in Portugal, where it’s known as “Bolo de Cocada.” Over time, it has evolved and found its way into kitchens around the world. The modern version with its rich, deep chocolate flavor is a delightful twist on the classic. I first tried this recipe at a friend’s dinner party, and I was instantly hooked. It’s a dessert that always brings a smile and a sense of wonder to the table.
Why You’ll Adore This Heavenly Dessert
There are so many reasons to love this Dreamy Chocolate Custard. The flavors are indulgent yet balanced, and the texture is just mind-blowing. Plus, it’s a one-bowl wonder, making cleanup a breeze. Whether you’re a seasoned baker or a novice, this recipe is a must-try.
Perfect Occasions to Prepare This Enchanting Cake
This cake is perfect for any special occasion. From birthdays to holidays, it’s a crowd-pleaser. It also makes a fantastic dessert for a romantic dinner or a simple family gathering. Trust me, once you try it, you’ll find any excuse to make it again and again.
Ingredients
- 4 egg yolks at room temperature
- 1 cup granulated white sugar
- 1 teaspoon vanilla extract
- 1/2 cup (1 stick) salted butter, melted
- 2 cups milk at room temperature or lukewarm
- 1/2 cup all-purpose flour
- 1/2 cup unsweetened cocoa powder
- 4 egg whites
- 1 tablespoon white granulated sugar
- 1/8 teaspoon salt
Substitution Options
If you’re out of a few ingredients, don’t worry! You can substitute all-purpose flour with cake flour for a lighter texture. If you prefer less sweetness, use dark chocolate cocoa powder. For a dairy-free option, try using almond milk instead of regular milk.
Preparation Section
Step 1: Prep the Baking Pan
Grease and line an 8×8-inch (20x20cm) baking pan with parchment paper, making sure there’s an overhang to lift out the cake later. This step is crucial for easy removal and a perfect presentation.
Step 2: Separate the Eggs
Carefully separate the eggs, placing the yolks in one bowl and the whites in another. This will help you achieve the perfect texture for each layer of the cake.
Step 3: Beat the Yolks
In the bowl with the yolks, add the sugar and vanilla extract. Beat until the mixture becomes pale and creamy, about 4 to 5 minutes. The color will lighten, and the texture will become smooth and glossy.
Step 4: Add the Butter
Pour in the cooled melted butter and mix on low speed for 1 minute. The mixture will become even creamier, and the butter will blend seamlessly.
Step 5: Sift in the Dry Ingredients
Sift in the flour and cocoa powder. Beat or whisk to combine. The dry ingredients will gradually mix in, creating a rich, chocolatey batter.
Step 6: Incorporate the Milk
Slowly pour in the milk while continuing to beat the mixture until just combined. The batter will be smooth and runny, which is exactly what you want for this magical cake.
Step 7: Preheat the Oven
Preheat your oven to 325°F (170°C) or 150°C if using a fan-assisted oven. This ensures the cake bakes evenly and achieves the perfect texture.
Step 8: Beat the Egg Whites
Rinse and dry the whisk or beaters. Beat the egg whites on medium speed for 1 minute. Add the sugar and salt, and continue beating for about 4 minutes until stiff peaks form. Be careful not to overbeat, as this can deflate the whites.
Step 9: Fold in the Egg Whites
Gently fold the beaten egg whites into the yolk mixture, adding half of the whites at a time with a spatula. The mixture will be thin and runny, but don’t worry; this is key to its magical transformation in the oven.
Step 10: Bake the Cake
Pour the mixture into the prepared pan and bake for 40-45 minutes. If the top is browning too quickly, cover it with a dome-shaped piece of foil, making sure it doesn’t touch the batter. Check the cake at 40 minutes. The top should be firm. Gently shake the tin; if there’s movement beneath the top, continue baking, covered with foil if necessary, checking every 5 minutes until firm.
Step 11: Let It Rest
Once baked, turn off the oven and leave the cake inside with the door slightly open for 5 minutes. This helps prevent the cake from collapsing. Remove the cake from the oven and cool in the pan for 30 minutes.
Step 12: Chill and Serve
Refrigerate the cake in the pan for 1 hour to allow the custard to set. The cake will shrink slightly as it cools. Remove from the fridge, sift cocoa powder or powdered sugar over the top if desired. Use the parchment overhang to lift the cake out of the pan, slice, and serve. Enjoy the magical layers of Dreamy Chocolate Custard!
Timing
Prep Time: 15 minutes
Cooking Time: 40-45 minutes
Resting Time: 30 minutes cooling + 1 hour chilling
Total Time: About 1 hour and 30 minutes
Chef’s Secret
For an extra touch of magic, sprinkle a pinch of sea salt on top of the cake before serving. The salt enhances the chocolate flavor and adds a delightful contrast to the sweetness.
Extra Info
Did you know that the magical layering of this cake happens due to the different densities of the egg whites and the yolk mixture? The egg whites rise to the top and form a light, airy layer, while the denser yolk mixture settles at the bottom, creating the fudgy base and creamy center. It’s like a scientific experiment in the kitchen, and it’s a total delight to see and taste!
Necessary Equipment
- 8×8-inch (20x20cm) baking pan
- Parchment paper
- Mixing bowls
- Whisk or electric mixer
- Measuring cups and spoons
- Spatula
- Aluminum foil
Storage
To keep your Dreamy Chocolate Custard fresh, store it in an airtight container in the refrigerator. It will stay delicious for up to 5 days. For longer storage, you can freeze the cake. Simply wrap it tightly in plastic wrap and aluminum foil, then place it in a freezer-safe bag. It will keep for up to 3 months. When you’re ready to enjoy, thaw it in the fridge overnight.
Tips and Advice
For the best results, make sure all your ingredients are at room temperature. This helps them blend more smoothly and ensures the cake bakes evenly. Also, don’t overmix the batter when incorporating the milk. Mix just until combined to avoid a tough texture.
Presentation Tips
- Sift a light dusting of cocoa powder or powdered sugar over the top for a professional look.
- Add a dollop of whipped cream or a scoop of vanilla ice cream for a decadent touch.
- Decorate with fresh berries or a drizzle of chocolate sauce for added flair.
Healthier Alternative Recipes
If you’re looking for a healthier twist, here are six variations to try:
- Dark Chocolate Avocado Custard Cake: Substitute avocado puree for some of the butter to add healthy fats and reduce calories.
- Gluten-Free Chocolate Custard Cake: Use gluten-free flour and ensure all other ingredients are gluten-free for a tasty and inclusive dessert.
- Vegan Chocolate Custard Cake: Replace eggs with a flax egg mixture and use plant-based milk and vegan butter for a cruelty-free option.
- Reduced Sugar Chocolate Custard Cake: Cut down on the sugar by using a natural sweetener like honey or maple syrup.
- Protein-Packed Chocolate Custard Cake: Add a scoop of chocolate protein powder to the batter for a post-workout treat.
- Fruit-Infused Chocolate Custard Cake: Stir in some mashed bananas or pureed berries for a fruity twist and added nutrients.
For more delightful desserts, check out these related recipes: Dreamy Blueberry Cupcakes, Dirty Snowmen Delight, Delicious Marble Cake, and Delicious Cornmeal Cake.
Common Mistakes to Avoid
Mistake 1: Not Separating the Eggs Properly
One common mistake is not separating the eggs properly, which can lead to a dense, unappealing cake. Make sure no egg yolk gets into the whites, as this can affect the whipping process. Use a clean, dry bowl for the egg whites to ensure they whip up beautifully.
Mistake 2: Overmixing the Batter
Overmixing the batter can result in a tough, chewy texture. Mix just until the ingredients are combined, and be gentle when folding in the egg whites. This will ensure a light and fluffy cake.
Mistake 3: Baking at Too High a Temperature
Baking at too high a temperature can cause the top to brown too quickly, while the inside remains undercooked. Follow the recommended temperature and check the cake regularly to ensure it bakes evenly. If the top is browning too fast, cover it loosely with foil.
Mistake 4: Not Chilling the Cake
Not allowing the cake to chill in the refrigerator after baking can result in a runny, unset custard. The chilling time is essential for the custard to set and the layers to develop. Patience is key for this magical dessert.
Mistake 5: Overbeating the Egg Whites
Overbeating the egg whites can make them dry and grainy, resulting in a poor texture in the final cake. Beat the whites until stiff peaks form, but be careful not to go too far. A good rule of thumb is to stop when the whites hold their shape but still have a slight sheen.
FAQ
Can I use a different type of milk?
Yes, you can use any type of milk, including almond milk or coconut milk, for a dairy-free option. Just make sure the milk is at room temperature or lukewarm to ensure it mixes well with the other ingredients.
What if I don’t have cocoa powder?Can I use regular flour instead of cake flour?
Yes, you can use regular all-purpose flour if you don’t have cake flour. However, cake flour will give you a lighter and more tender texture. If you decide to use all-purpose flour, you might notice a slight difference in the cake’s texture, but it will still be delicious.
How do I know when the cake is done?
To check if the cake is done, gently shake the pan. The top should be firm, and the center should not jiggle. If the center jiggles, continue baking for another 5 minutes and check again. The cake is done when the top is firm and the center is set.
Can I make this cake ahead of time?
Absolutely! You can make this cake a day in advance. After baking and cooling, refrigerate it in the baking pan. Before serving, let it come to room temperature or serve it chilled, depending on your preference. This allows the flavors to meld and the custard to set perfectly.
Is this cake suitable for people with dietary restrictions?
This cake can be adapted for various dietary restrictions. For a gluten-free version, use gluten-free flour. For a dairy-free option, replace the milk with a plant-based alternative. For a vegan version, use flax eggs and vegan butter. Always check the labels of your ingredients to ensure they meet your specific dietary needs.
What is the best way to store the leftover cake?
Store the leftover cake in an airtight container in the refrigerator. It will stay fresh for up to 5 days. For longer storage, wrap the cake tightly in plastic wrap and aluminum foil, then place it in a freezer-safe bag. It will keep for up to 3 months. Thaw the cake in the refrigerator overnight before serving.
Can I add other flavors to the cake?
Definitely! You can add a variety of flavors to this cake. Consider adding a teaspoon of cinnamon or a dash of orange zest for a unique twist. You can also stir in some chopped nuts or a tablespoon of your favorite liqueur for extra flavor. Just be mindful of how much additional liquid you add, as it can affect the texture.
How do I prevent the cake from sticking to the pan?
To prevent the cake from sticking, make sure to grease the pan thoroughly and line it with parchment paper. The parchment paper should have an overhang on the sides, which will make it easy to lift the cake out of the pan once it’s baked and cooled. This step is crucial for a clean and neat presentation.
Can I double the recipe?
Yes, you can double the recipe for a larger batch. Use a 9×13-inch (23x33cm) baking pan and adjust the baking time accordingly. Start with the original baking time and check the cake for doneness. If it needs more time, continue baking in 5-minute increments until the top is firm and the center is set.
What can I do if my cake is too dry?
If your cake turns out too dry, it might be due to overbaking or using too much flour. To fix this, you can brush the layers with a simple syrup made from equal parts water and sugar. This will add moisture and enhance the flavor. Alternatively, serve the cake with a drizzle of chocolate ganache or a scoop of ice cream to add some extra moisture and richness.
Conclusion
This Dreamy Chocolate Custard cake is a true marvel in the kitchen, turning a simple mixture into a multi-layered masterpiece. With its rich, fudgy bottom, creamy custard center, and light, fluffy top, it’s a dessert that never fails to impress. Whether you’re a seasoned baker or just starting out, this recipe is a must-try. Share it with your family and friends, and watch the smiles and compliments roll in. Happy baking!
For more delicious and easy-to-follow recipes, visit our Elite Cooking Recipes page. Enjoy your culinary adventures!
Dreamy Chocolate Custard
Ingredients
Equipment
Method
- Grease and line an 8x8-inch (20x20cm) baking pan with parchment paper.
- Carefully separate the eggs, placing the yolks in one bowl and the whites in another.
- In the bowl with the yolks, add the sugar and vanilla extract. Beat until pale and creamy (4-5 minutes).
- Pour in the cooled melted butter and mix on low speed for 1 minute.
- Sift in the flour and cocoa powder, then beat or whisk to combine.
- Slowly pour in the milk while continuing to beat until just combined.
- Preheat your oven to 325°F (170°C) or 150°C for fan-assisted ovens.
- Beat the egg whites on medium speed for 1 minute; add sugar and salt, then continue beating until stiff peaks form (about 4 minutes).
- Gently fold the beaten egg whites into the yolk mixture, adding half at a time.
- Pour the mixture into the prepared pan and bake for 40-45 minutes, covering with foil if the top browns too quickly.
- Turn off the oven, leaving the cake inside with the door slightly open for 5 minutes, then cool in the pan for 30 minutes.
- Refrigerate the cake in the pan for 1 hour, then lift out and slice.