
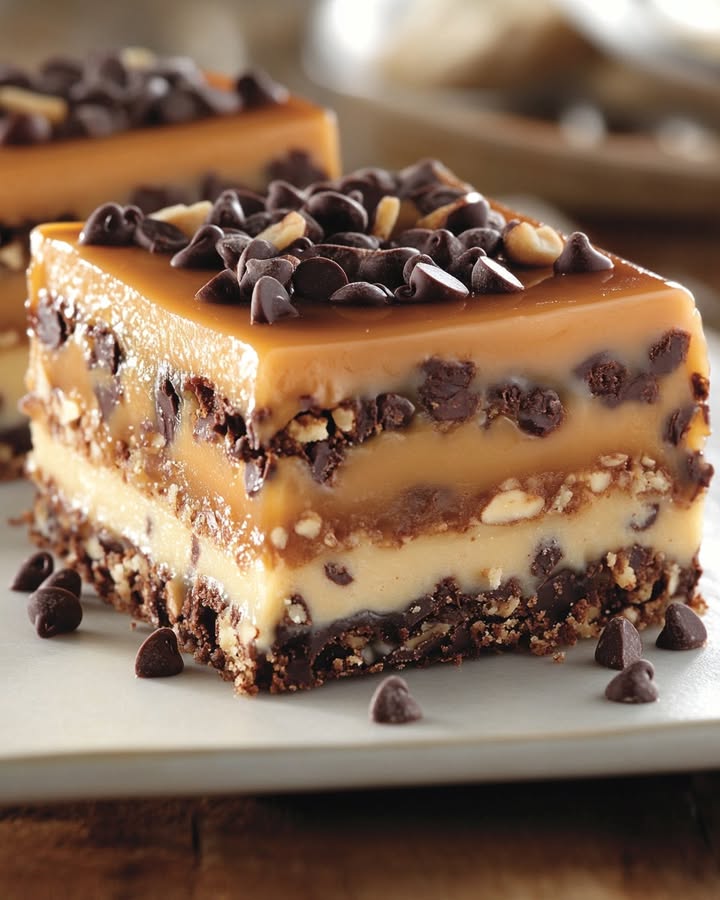
Get Ready to Be Blown Away by These Heavenly Naked Caramel Bars!
Imagine a dessert so decadent, it practically begs you to indulge. Welcome to the world of Naked Caramel Bars, a treat that will leave your taste buds dancing with joy. I first discovered this recipe at a friend’s holiday party, and it was love at first bite. The combination of gooey caramel, rich chocolate, and a buttery crust is simply irresistible. Trust me; you’ll be making these bars again and again.
A Sweet History: The Birth of Naked Caramel Bars
These bars have a bit of a mysterious past. Some say they originated in the Midwest, while others claim they were a hit in the South. Regardless of where they came from, one thing is certain: Naked Caramel Bars have become a beloved treat across the country. They’ve evolved from a simple bar to a multi-layered delight, combining the best of cookies, caramel, and chocolate. It’s a modern twist on a classic that everyone can enjoy.
Why You’ll Love This Recipe
These Naked Caramel Bars are a total crowd-pleaser. The flavors are rich and satisfying, and the texture is a perfect blend of chewy and crunchy. Plus, they’re surprisingly easy to make, even for baking novices. The recipe is versatile, too. You can add a sprinkle of sea salt for a savory kick or swap out the chocolate chips for white chocolate if you prefer. Trust me, once you try them, you’ll be hooked.
Perfect Occasions to Prepare This Recipe
These bars are perfect for any gathering. Whether it’s a family get-together, a potluck, or a holiday party, Naked Caramel Bars are sure to impress. They also make a fantastic gift, packaged in a cute box or tin. Your friends and neighbors will be asking for the recipe before you know it!
Ingredients
- 2 1/4 cups all-purpose flour
- 1 tsp baking soda
- 1 tsp salt
- 1 cup butter, softened
- 3/4 cup sugar
- 3/4 cup packed brown sugar
- 1 tsp vanilla extract
- 2 eggs
- 2 cups semi-sweet chocolate chips
- 5 oz evaporated milk
- 1 bag (14 oz) caramels
- 1/2 cup peanut butter
Substitution Options
If you’re missing an ingredient, don’t worry! You can substitute the all-purpose flour with almond flour for a gluten-free option. White chocolate chips or butterscotch chips can replace the semi-sweet chocolate chips. And if you’re out of caramels, you can use a homemade caramel sauce for a similar effect.
Detailed Preparation
Step 1: Preheat and Prep
Preheat your oven to 375°F (190°C). Grease a 9×13-inch baking pan thoroughly. In a small bowl, whisk together the all-purpose flour, baking soda, and salt. Set aside.
Step 2: Cream the Butter and Sugars
In a large mixing bowl, cream together the softened butter, sugar, and brown sugar until the mixture is light and fluffy. Add the vanilla extract and mix well. The kitchen will start to smell amazing at this point, and you might find yourself stealing a little taste test—just don’t eat it all!
Step 3: Add the Eggs
Add the eggs one at a time, beating well after each addition. The mixture will become smooth and velvety. Gradually mix in the dry ingredients until just combined. Stir in the chocolate chips. The dough will be thick and chunky, just how we like it.
Step 4: Bake the First Layer
Scoop half of the cookie dough into the prepared pan and spread it out evenly. Bake for 8-10 minutes, or until the edges are lightly golden. The aroma will be heavenly, and you’ll be tempted to dig in right away, but wait—it gets even better.
Step 5: Melt the Caramels
While the cookie dough is baking, melt the caramels and evaporated milk in a double boiler. Stir occasionally until the caramels are fully melted. Once melted, stir in the peanut butter and mix thoroughly. The caramel mixture will be smooth and creamy, ready to be poured over the baked cookie dough.
Step 6: Assemble the Layers
Carefully spread the caramel mixture evenly over the baked cookie dough. Drop spoonfuls of the remaining cookie dough over the caramel layer. Don’t worry if it’s not perfectly even; the rustic look adds to the charm.
Step 7: Bake and Cool
Bake the bars for 15-20 minutes, or until the top is golden brown. Remove from the oven and let them cool completely. The hardest part is waiting for them to cool, but it’s worth it—the flavors meld together beautifully as they cool.
Pro Tip: Add a Pinch of Sea Salt
For an extra burst of flavor, sprinkle a pinch of sea salt over the caramel layer before adding the top layer of cookie dough. The salty-sweet combination is divine and will make your bars even more irresistible.
Timing
Preparation time: 15 minutes
Cooking time: 25-20 minutes
Resting time: 1 hour
Total time: 50-60 minutes
Chef’s Secret: A Splash of Vanilla
To enhance the flavor, add an extra splash of vanilla extract to the caramel mixture. This little trick will make the caramel even more aromatic and delicious.
Extra Info
Did you know that the name “Knock You Naked Bars” comes from the idea that they are so good, they could knock you off your feet? It’s a playful way to show just how delightful these bars really are. Enjoy them with a glass of cold milk or a hot cup of coffee for the ultimate treat.
Necessary Equipment
- 9×13-inch baking pan
- Mixing bowls
- Electric mixer
- Double boiler (or a makeshift one using a saucepan and a heatproof bowl)
- Spatula
Storage
Store the Naked Caramel Bars in an airtight container at room temperature for up to 5 days. If you want to keep them longer, you can freeze them for up to 3 months. Just make sure to wrap them in plastic wrap and place them in a freezer-safe bag. When you’re ready to enjoy, let them thaw at room temperature for a few hours. The bars will retain their texture and flavor, making them the perfect make-ahead treat.
Tips and Advice
To ensure your bars come out perfectly, make sure your butter is softened to room temperature. Cold butter will make the dough tough and difficult to spread. Also, be patient when melting the caramels. Stirring frequently will help prevent sticking and ensure a smooth consistency. If you’re in a rush, you can use a microwave-safe bowl to melt the caramels and evaporated milk, but be careful not to overheat them.
Presentation Tips
For a fancy touch, drizzle some melted chocolate over the cooled bars before cutting. You can also dust them with a little powdered sugar. Cut them into neat squares or rectangles and serve them on a pretty platter. If you’re gifting them, consider wrapping each bar in a small clear bag tied with a ribbon. They’ll look and taste amazing!
Variations: Healthier Alternatives
- Gluten-Free Version: Use almond flour instead of all-purpose flour. Substitute the caramels with a gluten-free caramel sauce.
- Low-Sugar Version: Replace the regular sugars with a sugar substitute. Use sugar-free chocolate chips and sugar-free caramels.
- Vegan Version: Use vegan butter and plant-based milk. Substitute the caramels with a vegan caramel alternative and use dairy-free chocolate chips.
- White Chocolate Bliss: Swap the semi-sweet chocolate chips for white chocolate chips. The bars will be creamy and dreamy, with a hint of sweetness.
- Butterscotch Delight: Replace the chocolate chips with butterscotch chips. The sweet and tangy flavor will be a delightful change.
- Chocolate Peanut Butter Swirl: Mix melted peanut butter and chocolate together and swirl it into the dough for a marbled effect. The combination of chocolate and peanut butter is always a winner.
Common Mistakes to Avoid
Mistake 1: Overmixing the Dough
Overmixing the dough can make it tough and dense. Mix the ingredients just until they are combined. This will result in a tender and crumbly texture that complements the rich caramel and chocolate layers.
Mistake 2: Using Hard Butter
Make sure your butter is at room temperature. Cold butter won’t cream properly and will make the dough hard to work with. If you’re in a hurry, you can soften the butter in the microwave for a few seconds, but be careful not to melt it.
Mistake 3: Not Melting the Caramels Fully
Partial melting of the caramels can lead to a lumpy, uneven caramel layer. Stir the caramels and evaporated milk continuously until they are fully melted and smooth. This will ensure a luscious and even caramel layer that blends perfectly with the other ingredients.
Mistake 4: Baking Too Long
Overbaking the bars can make them dry and tough. Keep an eye on them and remove them from the oven when the top is golden brown. Let them cool completely before cutting. This will ensure that the bars are moist and chewy, just the way they should be.
Mistake 5: Not Cooling Completely
It’s tempting to cut into the bars right away, but cooling them completely is crucial. If you cut them too soon, the layers will stick together, and the bars may fall apart. Let them cool for at least an hour, or until they reach room temperature. This will make them easier to cut and ensure that the flavors meld together perfectly.
FAQ
Can I use a different type of chocolate?
Absolutely! Feel free to experiment with different types of chocolate chips. You can use dark chocolate, milk chocolate, or even white chocolate. Each type will give the bars a unique flavor profile. Dark chocolate will add a rich, intense flavor, while white chocolate will make them extra creamy and sweet.
Can I make these bars gluten-free?
Yes, you can! Simply replace the all-purpose flour with a gluten-free flour blend. Make sure to check that all other ingredients, such as the caramels and chocolate chips, are also gluten-free. This way, you can enjoy the same delicious bars without the gluten.
How long do these bars last?
When stored in an airtight container at room temperature, Naked Caramel Bars will last for up to 5 days. For longer storage, you can freeze them for up to 3 months. Just make sure to wrap them tightly in plastic wrap and place them in a freezer-safe bag.
Can I use a different type of nut butter?
Yes, you can! While the recipe calls for peanut butter, you can use other nut butters like almond butter, cashew butter, or even sunflower seed butter. Each type will add a unique flavor and texture to the bars. Just make sure the nut butter is smooth and creamy for the best results.
What can I do with leftover caramel?
If you have leftover caramel, you can use it in a variety of ways. Drizzle it over ice cream, dip fruit in it, or use it as a topping for pancakes or waffles. You can also store it in an airtight container in the refrigerator for later use. Just reheat it gently before using.
Can I make these bars in advance?
Absolutely! These bars are perfect for making ahead of time. You can prepare the bars and store them in the refrigerator or freezer until you’re ready to serve. Just make sure to let them come to room temperature before serving for the best texture and flavor.
How do I prevent the bars from sticking to the pan?
Greasing the pan thoroughly is key. You can also line the pan with parchment paper for easy removal. Make sure to leave an overhang on the sides so you can lift the bars out easily once they’re done. This will help prevent the bars from sticking and make cleanup a breeze.
Can I use homemade caramel instead of store-bought caramels?
Yes, you can! Homemade caramel is a great option. Just make sure it’s thick enough to spread over the cookie dough. If it’s too thin, it might seep through and make the bars soggy. You can also add a pinch of salt to the caramel for a deeper, richer flavor.
Can I add nuts to the bars?
Definitely! Adding chopped nuts like pecans, walnuts, or almonds to the cookie dough or on top of the caramel layer can add a nice crunch and extra flavor. Just make sure to chop the nuts finely so they distribute evenly throughout the bars.
How do I know when the bars are done?
The bars are done when the top is golden brown and the edges are firm. You can also insert a toothpick into the center. If it comes out clean or with a few crumbs, the bars are ready. Let them cool completely before cutting to ensure the layers set properly.
Whether you’re an experienced baker or a beginner, these Naked Caramel Bars are sure to be a hit. They’re the perfect treat for any occasion, and they’re so delicious that you might just end up making a batch for yourself. Enjoy the process, and remember, the best desserts are made with love and a little bit of fun. Happy baking!
For more delightful dessert recipes, check out our Moist Chocolate Ganache, Mississippi Mud Brownies, Minty Chocolate Delight, and Mini Fruit Tarts. Each one is a unique twist on a classic favorite, and they’re all sure to satisfy your sweet tooth.
Remember to follow food handling guidelines for the best results and to ensure the quality and safety of your treats. Happy baking, and enjoy sharing these delectable bars with your family and friends!
Naked Caramel Bars
Ingredients
Equipment
Method
- Preheat your oven to 375°F (190°C) and grease a 9x13-inch baking pan.
- In a small bowl, whisk together the all-purpose flour, baking soda, and salt; set aside.
- In a large mixing bowl, cream together the softened butter, sugar, and brown sugar until light and fluffy.
- Add the vanilla extract and mix well.
- Add the eggs one at a time, beating well after each addition, then gradually mix in the dry ingredients until just combined.
- Stir in the chocolate chips.
- Scoop half of the cookie dough into the prepared pan and spread it evenly, then bake for 8-10 minutes until the edges are golden.
- While the cookie dough is baking, melt the caramels and evaporated milk in a double boiler; stir in the peanut butter until smooth.
- Spread the caramel mixture over the baked cookie dough and drop spoonfuls of the remaining cookie dough over the top.
- Bake the bars for an additional 15-20 minutes until the top is golden brown, then let them cool completely.