
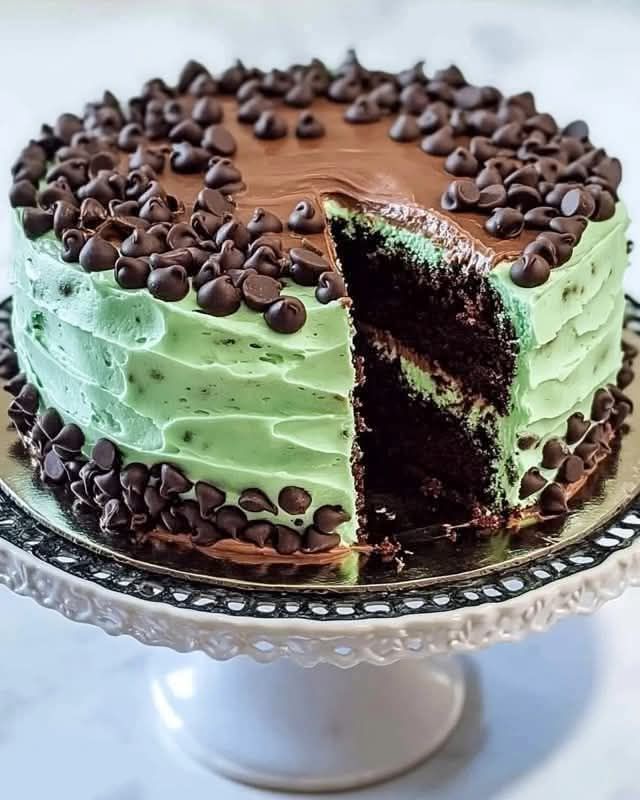
A Minty Chocolate Delight for Your Taste Buds
Imagine a cake that’s cool, refreshing, and oh-so-chocolatey—welcome to the world of Mint Chocolate Chip Cake! This recipe is a family favorite, a perfect blend of smooth, creamy chocolate and the zing of mint. It’s been a hit at every gathering, from birthdays to just-because weekends. Let me share why this cake is special and how you can make it in your own kitchen.
The Story Behind This Refreshing Treat
Every recipe has a story, and this one goes back to my grandmother’s kitchen. She used to make this cake for special occasions, and it was always the star of the show. Over the years, I’ve tweaked her recipe a bit, adding a touch more mint and using mini chocolate chips for a better texture. It’s a modern twist on a classic, and it never fails to impress.
Why You’ll Adore This Recipe
This Mint Chocolate Chip Cake is a real crowd-pleaser. The combination of rich chocolate and refreshing mint is simply divine. Plus, it’s surprisingly easy to make, even if you’re not a seasoned baker. The layers of moist cake and light, fluffy frosting create a delightful balance of flavors and textures. It’s the perfect dessert for any occasion, and it’s sure to become a favorite in your recipe book too!
Ideal Occasions for This Delicious Dessert
This cake is perfect for birthdays, holidays, or any time you want to add a special touch to your meal. I’ve served it at summer barbecues, holiday gatherings, and even as a surprise treat for my kids. It’s a versatile dessert that fits any season and any reason to celebrate. Trust me, once you try it, you’ll be looking for excuses to bake it again and again.
Ingredients for Your Minty Chocolate Delight
- 1 cup whole milk, room temperature
- 6 large egg whites, room temperature
- 2 teaspoons vanilla extract
- 2 1/4 cups bleached cake flour
- 1 3/4 cups sugar
- 4 teaspoons baking powder
- 12 tablespoons unsalted butter, cut into 12 pieces and softened but still cool
- 1 cup mini chocolate chips
- 1 1/2 teaspoons mint extract
- 5 drops green food coloring
- 20 tablespoons unsalted butter, cut into 20 pieces and softened
- 8 ounces bittersweet chocolate, melted and cooled
- 1 teaspoon vanilla extract
- 1/8 teaspoon salt
- 2 cups confectioners sugar
- 1 1/2 cups mini chocolate chips
Substitution Options
If you don’t have all the ingredients on hand, here are some substitutes:
- Cake Flour: You can use all-purpose flour, but the cake will be a bit denser.
- Bittersweet Chocolate: Semi-sweet chocolate works well too, though it will be a bit sweeter.
- Vanilla Extract: If you prefer, you can use almond extract for a different flavor profile.
Step-by-Step Preparation
Step 1: Preheat and Prepare
Preheat your oven to 350 degrees and adjust the rack to the middle position. Grease and flour three 8-inch cake pans. In a large measuring cup, mix together the milk, egg whites, and vaniila extract. The mixture should be smooth and silky, setting the stage for a perfectly moist cake.
Step 2: Mix the Dry Ingredients
In a stand mixer fitted with a paddle attachment, combine the flour, sugar, baking powder, and salt on low speed until just mixed—about 5 seconds. Gradually add the butter, one piece at a time, until the mixture resembles small peas, which should take about a minute. This step is crucial for achieving the right texture in your cake.
Step 3: Add the Wet Ingredients
Next, add half of the milk mixture, increase the speed to medium-high, and beat until the batter is light and fluffy—around 30 seconds. Then, lower the speed to medium-low, add the remaining milk mixture, and beat until just incorporated—about 15 seconds. This step ensures that the batter is well combined without overmixing, which can make the cake tough.
Step 4: Add the Flavors
Stir in the mini chocolate chips, mint extract, and green food coloring until everything is well combined. The batter should be a beautiful, vibrant green, and the aroma of mint and vanilla will fill your kitchen. This is the moment when the cake really comes to life!
Step 5: Bake the Cakes
Divide the batter evenly among the prepared pans and bake for 20 to 25 minutes, or until a toothpick inserted into the center comes out clean. Allow the cakes to cool in the pans for 10 minutes before transferring them to a wire rack to cool completely for at least an hour. The cakes will rise beautifully and fill your home with a heavenly scent.
Step 6: Make the Frosting
For the frosting, use a stand mixer with a whisk attachment to beat together the butter, melted chocolate, vanilla, and salt on medium-high until combined. Reduce the speed to medium-low and slowly add the confectioners sugar, mixing until smooth—about 1 minute. Turn the speed back up to medium-high and beat until the frosting is light and fluffy—3 to 5 minutes. The frosting should be smooth and spreadable, with a rich, chocolatey flavor.
Timing
Here’s a quick breakdown of the timing:
- Prep Time: 20 minutes
- Cooking Time: 25 minutes
- Resting Time: 1 hour
- Total Time: 1 hour 45 minutes
Chef’s Secret
To enhance the flavor, add a pinch of sea salt to the frosting. The salt will bring out the richness of the chocolate and add a subtle, delightful note to the overall taste. This little trick makes a big difference!
Extra Info
Did you know that mint and chocolate are a classic combination in many cultures? From the U.S. to Europe, this pairing is a beloved staple. The freshness of the mint complements the depth of the chocolate, creating a harmonious and irresistible flavor.
Necessary Equipment
- Three 8-inch cake pans
- Stand mixer with paddle and whisk attachments
- Measuring cups and spoons
- Mixing bowls
- Wire cooling rack
- Toothpick
Storage
Store the Mint Chocolate Chip Cake in an airtight container at room temperature for up to 3 days. For longer storage, refrigerate the cake, but keep in mind that the frosting may harden slightly. To serve, let it come to room temperature for the best texture. If you need to store the cake for more than a week, consider freezing it. Wrap the cake tightly in plastic wrap and place it in a freezer bag. It will keep for up to 3 months. When you’re ready to enjoy it, let it thaw in the refrigerator overnight.
Tips and Advice
Make sure all your ingredients are at room temperature before starting. This helps the ingredients blend more smoothly and results in a better-textured cake. Also, don’t overmix the batter; it can lead to a dense, tough cake. Stop mixing once the ingredients are just combined.
Presentation Tips
- Top the cake with a few fresh mint leaves for a pop of color and a hint of natural mint flavor.
- Drizzle a little melted chocolate over the top for an extra touch of elegance.
- Add a sprinkle of powdered sugar for a simple yet stunning finish.
Healthier Alternative Recipes
Here are six variations of this delicious cake, each with a unique twist:
- Mini Fruit Tarts: Swap out the chocolate chips for a variety of fresh fruits. These mini tarts are a lighter, fresher version that’s perfect for a summer day. Check out this recipe for a detailed guide.
- Mini Cheesecake Brûlées: Combine the flavors of cheesecake and brûlée for a unique and decadent dessert. The mint and chocolate can be incorporated into the cheesecake layer for a delightful twist. Find the full recipe here.
- Melting Belgian Ganache: Use a rich, velvety ganache instead of traditional frosting. This version is luxurious and indulgent, perfect for chocolate lovers. Get the recipe here.
- Melted Malva Bliss: Incorporate the flavors of a traditional Malva pudding into your cake. This variation is moist, sweet, and utterly comforting. Find the recipe here.
- Gluten-Free Chocolate Chip Mint Cake: Use gluten-free flour and keep the rest of the recipe the same. This version is perfect for those with dietary restrictions. Look for a good gluten-free flour blend at your local grocery store.
- Vegan Mint Chocolate Chip Cake: Replace the eggs with flax eggs and use vegan butter and chocolate. This plant-based version is just as delicious and satisfying. Flax eggs are a great way to add binding and moisture to your baked goods.
Common Mistakes to Avoid
Mistake 1: Overmixing the Batter
Overmixing the batter can result in a dense, tough cake. Once the dry and wet ingredients are just combined, stop mixing. This will ensure a light and fluffy texture. Pro Tip: Use a spatula to fold in the final ingredients gently.
Mistake 2: Not Using Room Temperature Ingredients
Using cold ingredients can lead to uneven mixing and a less smooth batter. Make sure all your ingredients are at room temperature before starting. This will help the ingredients blend more seamlessly and result in a better-textured cake.
Mistake 3: Opening the Oven Door Too Often
Opening the oven door while the cake is baking can cause the temperature to drop, leading to uneven baking. Resist the urge to peek and wait until the baking time is nearly up. A consistent temperature is key to a perfectly baked cake.
Mistake 4: Not Letting the Cake Cool Completely
Frosting a warm cake can cause the frosting to melt and slide off. Make sure the cakes are completely cool before frosting. This will ensure a smooth, even layer of frosting that holds its shape.
Mistake 5: Skimping on the Frosting
Using too little frosting can make the cake look sparse and unappetizing. Be generous with the frosting, especially between the layers and on the sides. This will give your cake a professional, polished look.
FAQ
Can I use regular-sized chocolate chips instead of mini ones?
Yes, you can use regular-sized chocolate chips, but they might sink to the bottom of the cake. Mini chocolate chips are ideal because they disperse more evenly throughout the batter, providing a better texture and flavor profile.
What if I don’t have mint extract?
If you don’t have mint extract, you can use peppermint extract as a substitute. Start with a smaller amount, as peppermint can be stronger in flavor. You can also use a few drops of food-grade peppermint oil, but be cautious as it’s very potent.
Can I make this cake ahead of time?
Absolutely! You can make the cake layers ahead of time and store them in an airtight container at room temperature for up to a day. Just make sure to let them cool completely before storing. The frosting can also be made ahead and stored in the refrigerator. Let it come to room temperature and give it a quick whip before using.
Is this cake suitable for someone with a gluten allergy?
Not in its original form, but you can easily make it gluten-free by using a gluten-free flour blend. Just make sure to check the label to ensure it’s certified gluten-free. This substitution will allow you to enjoy the cake without any gluten-related concerns.
Can I use a different type of chocolate for the frosting?
Yes, you can use a different type of chocolate for the frosting. Dark chocolate, milk chocolate, or even white chocolate can be used. Each type will give a different flavor profile, so choose based on your preference. Just make sure it’s high-quality chocolate for the best results.
How do I store leftover cake?
Store the leftover cake in an airtight container at room temperature for up to 3 days. For longer storage, you can refrigerate the cake, but keep in mind that the frosting may harden slightly. To serve, let it come to room temperature for the best texture. If you need to store the cake for more than a week, consider freezing it. Wrap the cake tightly in plastic wrap and place it in a freezer bag. It will keep for up to 3 months. When you’re ready to enjoy it, let it thaw in the refrigerator overnight.
Can I make this cake in a single layer?
Yes, you can make this cake in a single layer. Simply use a 9-inch round pan and increase the baking time to about 35-40 minutes, or until a toothpick inserted into the center comes out clean. This single-layer version is perfect for smaller gatherings or if you prefer a simpler presentation.
What if I don’t have a stand mixer?
If you don’t have a stand mixer, you can use a hand mixer or even mix the ingredients by hand. The key is to make sure everything is well combined and the batter is smooth. It may take a bit more effort, but the end result will be just as delicious.
Can I add a different flavor to the cake?
Of course! While the original recipe calls for mint, you can experiment with other flavors. Orange, raspberry, or even coffee can be excellent alternatives. Just replace the mint extract with the extract of your choice and adjust the food coloring accordingly. The possibilities are endless, and you can tailor the cake to your personal taste.
How do I prevent the cake from sticking to the pan?
To prevent the cake from sticking to the pan, make sure to grease and flour the pans thoroughly. You can also use parchment paper for an extra layer of protection. Place a circle of parchment paper at the bottom of each pan, then grease and flour the sides. This will ensure that the cake releases cleanly and easily.
Whether you’re a seasoned baker or a beginner, this Mint Chocolate Chip Cake is a delightful treat that’s sure to impress. Don’t forget to explore more delicious recipes in our Desserts section. Happy baking!
Mint Chocolate Chip Cake
Ingredients
Equipment
Method
- Preheat your oven to 350°F (175°C) and prepare three 8-inch cake pans by greasing and flouring them.
- In a measuring cup, mix together the milk, egg whites, and vanilla extract until smooth.
- In a stand mixer, combine flour, sugar, baking powder, and salt on low speed for about 5 seconds.
- Gradually add the cold butter pieces until the mixture resembles small peas (about 1 minute).
- Add half of the milk mixture, beat on medium-high until light and fluffy (around 30 seconds).
- Lower speed and add the remaining milk mixture, beating until just incorporated (about 15 seconds).
- Stir in mini chocolate chips, mint extract, and green food coloring until well combined.
- Divide the batter evenly among the prepared pans and bake for 20 to 25 minutes until a toothpick comes out clean.
- Allow cakes to cool in the pans for 10 minutes, then transfer to a wire rack to cool completely for at least 1 hour.
- For the frosting, beat together butter, melted chocolate, vanilla, and salt until combined.
- Slowly add confectioners sugar, mixing until smooth (about 1 minute), then beat on medium-high until light and fluffy (3 to 5 minutes).