
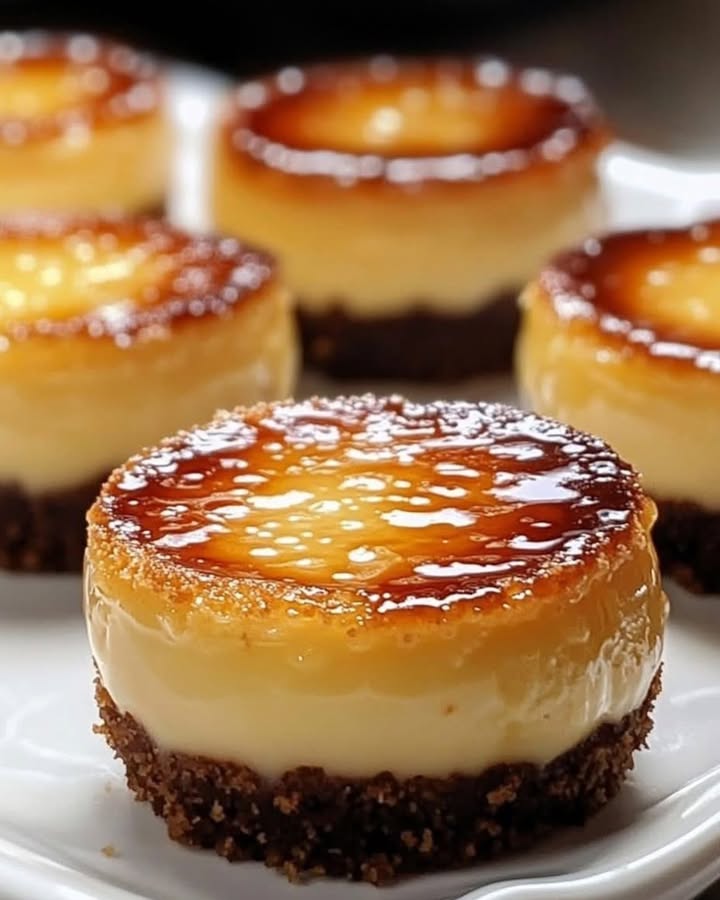
Welcome to the Mini Cheesecake Brûlées Adventure!
Oh, how I love a good cheesecake! But let’s face it, sometimes you just want a little something special. Enter the Mini Cheesecake Brûlées. These little treats are the perfect blend of creamy cheesecake and a crispy caramelized top, making them a delightful and elegant dessert for any occasion.
A Brief History of These Tiny Delights
I first fell in love with these mini delights at a friend’s baby shower. The idea of combining the classic cheesecake with the French technique of brûlée is a match made in heaven. Traditionally, cheesecakes have been a staple in American desserts, while crème brûlée has its roots in European cuisine. This fusion creates a unique and irresistible treat that everyone adores.
Why You’ll Love These Mini Cheesecake Brûlées
These mini cheesecakes are not just a feast for the eyes; they’re also a treat for your taste buds. The creamy, smooth texture of the cheesecake combined with the satisfying crunch of the brûléed sugar top is simply divine. Plus, they’re super easy to make, even for those who might not consider themselves master bakers.
Perfect Occasions for Mini Cheesecake Brûlées
These little beauties are perfect for almost any gathering. Whether it’s a casual get-together, a birthday party, or a more formal event like a wedding, these mini cheesecakes never fail to impress. They’re also a great option for those times when you want a sweet treat without the guilt of a full-sized slice.
Ingredients
- For the crust:
- 1 cup of graham cookie crumbs
- 2 Tbsp. of granulated sugar
- 4 Tbsp. of melted butter
- For the filling:
- 16 oz (450 g) cream cheese, softened
- 1/2 cup of granulated sugar
- 2 large eggs
- 1 tsp. vanilla extract
- 1/2 cup of sour cream
- For the topping:
- 1/4 cup of granulated sugar
- Fresh berries (optional)
Substitution Options
If you need to swap out some ingredients, here are a few options:
- Graham cookie crumbs: You can use digestive biscuits or vanilla wafers.
- Cream cheese: Try using Neufchâtel cheese for a slightly lighter version.
- Sour cream: Greek yogurt works well as a substitute.
Preparation Section
Step 1: Preheat Your Oven
Start by preheating your oven to 325°F (163°C). While the oven is warming up, line a muffin tin with cupcake liners. This will make it easier to remove the cheesecakes later.
Step 2: Make the Crust
In a mixing bowl, combine the graham cookie crumbs, sugar, and melted butter. Stir until the mixture resembles wet sand. Press about 1 tablespoon of the crust mixture into the bottom of each cupcake liner. Use the back of a spoon to press it down firmly. This will give you a nice, solid base for your cheesecake.
Step 3: Prepare the Filling
In another mixing bowl, beat the cream cheese and sugar together until smooth and creamy. Add the eggs one at a time, beating well after each addition. Stir in the vanilla extract and sour cream. The mixture should be smooth and free of lumps. Pro tip: Make sure your cream cheese is at room temperature to avoid lumps.
Step 4: Fill the Muffin Tin
Divide the cream cheese mixture evenly among the prepared crusts. Each cup should be about 3/4 full. Smooth the tops with a spatula to ensure even baking. The creamy, pale yellow batter looks so inviting, doesn’t it?
Step 5: Bake to Perfection
Bake the cheesecakes for 20-25 minutes, or until they are set but still have a slight jiggle in the center. They should be a light golden brown on top. Remove from the oven and let them cool to room temperature, then refrigerate for at least 2 hours. This chilling time allows the cheesecakes to set and makes them easier to handle.
Step 6: Add the Brûlée Touch
Once the cheesecakes are chilled, sprinkle a thin, even layer of sugar over the top of each one. Use a kitchen torch to caramelize the sugar, creating a beautiful, golden-brown crust. The sugar will start to bubble and turn a deep amber color. This step is where the magic happens, and the sweet, caramelized aroma is irresistible.
Step 7: Decorate and Serve
Add fresh berries on top for a pop of color and a burst of freshness. Arrange them artfully, or just sprinkle a few on top. Now, all that’s left is to serve and enjoy these delectable Mini Cheesecake Brûlées. Chef’s tip: A dollop of whipped cream or a drizzle of melted chocolate can add an extra touch of indulgence.
Timing
Here’s a quick breakdown of the timings:
- Prep Time: 20 minutes
- Cooking Time: 20-25 minutes
- Resting Time: 2 hours (cooling and chilling)
- Total Time: 2 hours 45 minutes
Chef’s Secret
One of my favorite tricks is to add a pinch of salt to the crust. It might sound odd, but the salt enhances the flavors and balances the sweetness, making the crust even more delicious.
Extra Info
Did you know that cheesecake dates back to ancient Greece? The original recipe was quite simple, consisting of cheese, honey, and wheat. Over the centuries, it has evolved into the creamy, rich dessert we know today. And now, with the addition of the brûlée technique, it’s more sophisticated than ever.
Necessary Equipment
- Muffin tin
- Cupcake liners
- Mixing bowls
- Spatula
- Kitchen torch
Storage
Store your Mini Cheesecake Brûlées in an airtight container in the refrigerator. They will keep well for up to 5 days. If you want to freeze them, wrap each one individually in plastic wrap and place them in a freezer bag. They can be frozen for up to 3 months. When you’re ready to serve, thaw them in the refrigerator overnight and re-caramelize the sugar before serving.
Tips and Advice
- Make sure your cream cheese is at room temperature to avoid lumps in the batter.
- Use a kitchen scale to measure your ingredients for the best results.
- Don’t open the oven door while the cheesecakes are baking to prevent them from sinking.
Presentation Tips
- Add a sprig of mint or a dab of whipped cream for a touch of elegance.
- Arrange the mini cheesecakes on a tiered stand for a visually stunning display.
- Use a variety of fresh berries for a colorful and appetizing look.
Healthier Alternative Recipes
- Reduced-Fat Cheesecake Brûlées: Substitute Neufchâtel cheese for regular cream cheese and use low-fat sour cream.
- Vegan Cheesecake Brûlées: Use a vegan cream cheese alternative and replace the eggs with a plant-based egg replacer.
- Gluten-Free Cheesecake Brûlées: Use gluten-free graham cracker crumbs or a similar gluten-free cookie for the crust.
- Low-Sugar Cheesecake Brûlées: Reduce the amount of sugar in the filling and use a sugar substitute like stevia for the brûlée topping.
- Matcha Cheesecake Brûlées: Add a tablespoon of matcha powder to the cream cheese mixture for a green tea flavor.
- Lemon Cheesecake Brûlées: Stir in a tablespoon of lemon zest and a splash of lemon juice for a zesty twist.
For a rich and decadent treat, try our Melting Belgian Ganache or Melted Malva Bliss. If you prefer something more traditional, our Marble Cake Delight and M&M Chocolate Cake are sure to please.
Common Mistakes to Avoid
Mistake 1: Overbeating the Cream Cheese
Overbeating the cream cheese can introduce air bubbles, which can cause the cheesecakes to crack. To avoid this, mix the cream cheese and sugar just until smooth, and then add the other ingredients. Practical tip: Use a spatula to scrape the sides of the bowl and make sure everything is well incorporated.
Mistake 2: Not Chilling Long Enough
Not chilling the cheesecakes long enough can result in a runny, soft texture. Make sure to chill them for at least 2 hours before adding the brûlée topping. This allows the cheesecake to set properly and makes it easier to handle.
Mistake 3: Uneven Sugar Layer
An uneven layer of sugar on top of the cheesecakes can lead to an inconsistent brûlée. Sprinkle the sugar in a thin, even layer across the entire surface. This ensures that the sugar caramelizes evenly and gives you that perfect, crunchy top. Pro tip: Use a fine-mesh sieve to sprinkle the sugar for an even distribution.
Mistake 4: Over-Browning the Topping
Over-browning the sugar can result in a bitter, burnt flavor. Keep the kitchen torch moving quickly and evenly over the sugar. Once you see the sugar start to bubble and turn golden, stop. This will give you the perfect, caramelized top without the bitterness.
Mistake 5: Using Cold Cream Cheese
Using cold cream cheese can result in a lumpy, unappetizing texture. Make sure your cream cheese is at room temperature before mixing. This will help it blend smoothly with the other ingredients, giving you a silky, creamy cheesecake.
Adding a pinch of salt to the crust not only enhances the flavor but also provides a subtle balance to the sweetness. For more tips on balancing flavors and nutrition, check out the USDA’s guide on protein-rich foods.
Now that you’ve mastered the art of Mini Cheesecake Brûlées, why not explore more delectable desserts in our Desserts category?
FAQ
Can I use a different type of crumb for the crust?
Yes, you can use other types of crumbs, such as digestive biscuits or vanilla wafers. Just make sure to crush them finely and mix them with the sugar and melted butter as directed.
What if I don’t have a kitchen torch?
If you don’t have a kitchen torch, you can achieve a similar effect by using your oven’s broiler. Place the sugared cheesecakes under the broiler for a few minutes, watching closely to prevent burning.
Can I make these ahead of time?
Absolutely! You can make the cheesecakes up to a day in advance and store them in the refrigerator. Just add the brûlée topping right before serving.
How do I know when the cheesecakes are done?
The cheesecakes are done when they are set but still have a slight jiggle in the center. Overbaking can cause them to crack, so it’s important to follow the timing carefully.
Can I use a different type of cheese?
While traditional cream cheese is the best choice, you can use Neufchâtel cheese for a lighter version. However, other types of cheese may not yield the same creamy texture.
What if I don’t have sour cream?
You can use Greek yogurt as a substitute for sour cream. It will give you a similar tangy flavor and creamy texture.
Can I make these gluten-free?
Yes, you can use gluten-free graham cracker crumbs or a similar gluten-free cookie for the crust. Just make sure the rest of your ingredients are also gluten-free.
Can I add other flavors to the filling?
Definitely! You can add a variety of flavors to the filling. Some popular options include lemon zest, matcha powder, or even a dash of pumpkin spice.
How do I store leftover cheesecakes?
Store leftover cheesecakes in an airtight container in the refrigerator. They will keep well for up to 5 days. For longer storage, you can freeze them, but the texture may change slightly upon thawing.
Can I make these in a regular cake pan?
Yes, you can make these in a regular cake pan, but you’ll need to adjust the baking time. A 9-inch round pan will take about 25-30 minutes, or until the edges are set but the center is still slightly jiggly.
Conclusion
There you have it, a delicious and charming dessert that’s sure to impress. These Mini Cheesecake Brûlées are a delightful combination of creamy cheesecake and a crispy, caramelized top. They’re perfect for any occasion and are surprisingly easy to make. So, roll up your sleeves, grab your apron, and get ready to create a dessert that will have everyone asking for more! Happy baking!
Mini Cheesecake Brûlées
Ingredients
Equipment
Method
- Preheat your oven to 325°F (163°C) and line a muffin tin with cupcake liners.
- In a mixing bowl, combine the graham cookie crumbs, sugar, and melted butter until it resembles wet sand.
- Press about 1 tablespoon of the mixture into the bottom of each cupcake liner.
- In another mixing bowl, beat the cream cheese and sugar until smooth, then add eggs one at a time, mixing well.
- Stir in vanilla extract and sour cream until smooth.
- Divide the mixture evenly among the prepared crusts, filling each about 3/4 full.
- Bake for 20-25 minutes until set with a slight jiggle in the center. Let cool to room temperature, then refrigerate for at least 2 hours.
- Sprinkle a thin layer of sugar on top and use a kitchen torch to caramelize until golden brown.
- Decorate with fresh berries and serve.