
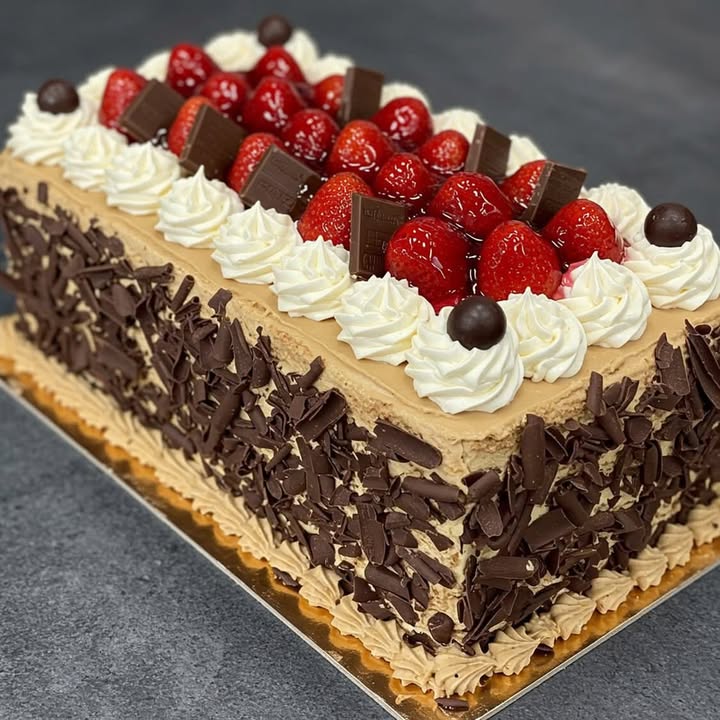
Discover the Irresistible Strawberry Chocolate Delight
Imagine a rich, moist chocolate cake layered with sweet strawberries and creamy condensed milk. This Strawberry Chocolate Delight is not just a cake; it’s a slice of heaven that will make any occasion unforgettable. I first tried this recipe at a friend’s birthday, and it was love at first bite. The combination of flavors is simply divine, and I knew I had to share it with you!
History and Background of the Recipe
This delicious dessert has its roots in classic American comfort food, but with a twist. The traditional chocolate cake gets a modern makeover with the addition of fresh strawberries and condensed milk. I remember my grandmother making a simple chocolate cake for family gatherings, but this version takes it to the next level. It’s a perfect blend of nostalgia and innovation.
Why You’ll Love This Recipe
The Strawberry Chocolate Delight is a treat for your taste buds. The moist chocolate cake pairs perfectly with the juicy, sweet strawberries and the rich, creamy filling. It’s a balance of textures and flavors that will leave you wanting more. Plus, it’s surprisingly easy to make, even for beginners. Your friends and family will be amazed by your baking skills!
Perfect Occasions to Prepare This Recipe
This cake is a showstopper for any celebration. Whether it’s a birthday, anniversary, or just a weekend get-together, the Strawberry Chocolate Delight is sure to impress. It also makes a fantastic dessert for a romantic dinner or a special family meal. Trust me, once you try it, you’ll find any excuse to bake it again!
Ingredients
- 3 cups of flour
- 1 cup of cocoa powder
- 2 teaspoons of baking soda
- 1 teaspoon of salt
- 3 eggs
- 1 cup of oil
- 1 cup of buttermilk (milk mixed with 2 lemons juice)
- 2 teaspoons of vanilla essence
- 2 cups of sugar
- 1 cup of whole milk to make buttermilk
For Filling
- 100 g of butter
- 2 cans of condensed milk
- 150 g of powdered milk
- 200 g of chopped strawberries
Substitution Options
If you don’t have some of the ingredients, don’t worry! You can use vegetable oil instead of regular oil, and if you don’t have buttermilk, mix 1 cup of milk with 2 tablespoons of lemon juice and let it sit for 15 minutes. You can also swap the strawberries for other berries like raspberries or blueberries. The possibilities are endless!
Preparation
Step 1: Preheat the Oven
First, preheat your oven to 350°F (180°C) and grease a cake mold. Cover the bottom with butter and a sheet of parchment paper. This will make it easier to remove the cake later.
Step 2: Make the Buttermilk
In a small bowl, mix 1 cup of milk with the juice of 2 lemons. Let it sit for about 15 minutes until it thickens slightly. This homemade buttermilk adds a tangy flavor to the cake, making it extra moist and delicious.
Step 3: Mix Dry Ingredients
In a large mixing bowl, sift together the flour, baking soda, salt, and cocoa powder. Sifting helps to remove any lumps and ensures a smoother batter. Set this aside for now.
Step 4: Mix Wet Ingredients
In another bowl, combine the eggs, oil, buttermilk, and vanilla essence. Whisk these ingredients together until they are well combined. The mixture should be smooth and slightly frothy.
Step 5: Combine Dry and Wet Ingredients
Add the dry ingredients to the wet ingredients in two batches, mixing gently with a spatula. Use a folding motion to avoid overmixing, which can make the cake tough. The batter should be smooth and free of lumps.
Step 6: Add Sugar
Stir in the sugar and mix well until all the ingredients are fully integrated. The batter will be thick and glossy, and it should smell heavenly with the aroma of chocolate and vanilla.
Step 7: Bake the Cake
Pour the batter into the prepared cake mold and smooth the top with a spatula. Bake for 25 minutes, or until a toothpick inserted into the center comes out clean. The cake will rise and become a deep, rich brown color.
Step 8: Cool the Cake
Let the cake cool in the mold for about 10 minutes, then carefully demold it and let it cool completely on a wire rack. This step is crucial as it allows the cake to set properly and makes it easier to handle.
Step 9: Cut the Cake
Once the cake is completely cool, cut it into 2 or 3 layers, depending on your preference. A sharp, serrated knife works best for this. Take your time to ensure the layers are even.
Step 10: Prepare the Filling
In a saucepan, melt the butter over medium heat. Add the two cans of condensed milk and powdered milk. Stir well to form a smooth, creamy mixture. Finally, add the chopped strawberries and mix everything together. The filling should be thick and luscious, with bits of juicy strawberries throughout.
Step 11: Assemble the Cake
Place the first layer of the cake on a serving plate and spread a generous amount of the filling on top. Add the second layer and repeat. If you have a third layer, add it and cover the top with the remaining filling. The cake should look irresistible with the layers of chocolate and strawberry filling.
Chef’s Tip
To make the cake even more indulgent, you can add a layer of whipped cream or a drizzle of chocolate ganache on top. This adds an extra touch of richness and makes the cake look even more enticing.
Timing
Prep time: 30 minutes
Cooking time: 25 minutes
Resting time: 10 minutes
Total time: About 1 hour and 15 minutes
Chef’s Secret
A little trick to enhance the flavor is to add a pinch of cinnamon to the cake batter. It adds a subtle, warm spice that complements the chocolate and strawberry perfectly. Give it a try and see how it elevates the cake!
Extra Info
Did you know that strawberries are not actually berries? They are technically a type of fruit called an accessory fruit. Isn’t that fascinating? This fun fact always makes for a great conversation starter when you’re serving this cake to guests!
Necessary Equipment
- Large mixing bowls
- Spatulas
- Whisk
- Cake mold
- Parchment paper
- Toothpick
- Wire rack
- Serrated knife
- Saucepan
Storage
To keep your Strawberry Chocolate Delight at its best, store it in an airtight container in the refrigerator. It will stay fresh for up to 5 days. If you want to freeze it, wrap each layer separately in plastic wrap and then in aluminum foil. Thaw it in the refrigerator before serving.
For the best texture, let the cake come to room temperature before serving. This will allow the flavors to meld and the cake to regain its moisture. Serve it with a dollop of whipped cream or a scoop of vanilla ice cream for an extra special treat.
Tips and Advice
- Make sure all your ingredients are at room temperature before starting. This helps them mix better and results in a smoother batter.
- Don’t overmix the batter. Overmixing can cause the cake to become tough and dense. Mix just until the ingredients are combined.
- Use a toothpick to check if the cake is done. Insert it into the center of the cake; if it comes out clean, the cake is ready.
Presentation Tips
For a stunning presentation, garnish the cake with fresh strawberries, a dusting of powdered sugar, and a few sprigs of mint. You can also create a decorative border around the edge of the cake with piped whipped cream or chocolate ganache. Get creative and make it your own!
Healthier Alternative Recipes
- Whole Wheat Chocolate Cake: Substitute the all-purpose flour with whole wheat flour for a healthier option. Whole wheat flour adds fiber and nutrients without sacrificing the rich, chocolatey flavor.
- Reduced Sugar Version: Reduce the amount of sugar in the recipe and add a natural sweetener like honey or maple syrup. This keeps the cake sweet but with fewer calories.
- Vegan Chocolate Cake: Replace the eggs with applesauce or mashed bananas, and use a plant-based milk for the buttermilk. This version is perfect for those with dietary restrictions.
- No-Butter Filling: Use a vegan margarine or coconut oil instead of butter in the filling. This makes the cake dairy-free and still deliciously creamy.
- Fruit-Topped Cake: Instead of the condensed milk and powdered milk filling, use a light whipped cream and top the cake with a variety of fresh fruits. This adds natural sweetness and vibrant colors.
- Gluten-Free Version: Swap the regular flour for a gluten-free flour blend. This makes the cake suitable for those with gluten sensitivities while keeping the same rich, moist texture.
Common Mistakes to Avoid
Mistake 1: Overmixing the Batter
Overmixing the batter can lead to a dense, tough cake. Mix just until the ingredients are combined. The batter should be smooth and free of lumps, but it doesn’t need to be perfectly homogeneous. Pro tip: Use a folding motion with a spatula to gently incorporate the ingredients.
Mistake 2: Not Preheating the Oven
Preheating the oven is crucial for even baking. If the oven isn’t hot enough, the cake may not rise properly and could end up flat and dense. Make sure to preheat the oven to 350°F (180°C) before you start mixing the batter.
Mistake 3: Overbaking the Cake
Overbaking can make the cake dry and crumbly. Check the cake at the 25-minute mark by inserting a toothpick into the center. If it comes out clean, the cake is done. If not, bake for an additional 5 minutes and check again. Keeping a close eye on the cake will ensure it’s perfectly moist and delicious.
Mistake 4: Using Cold Ingredients
Using ingredients straight from the fridge can affect the texture and consistency of the cake. Make sure all your ingredients, including eggs and milk, are at room temperature. This helps them mix better and results in a smoother batter.
Mistake 5: Improperly Layering the Cake
When assembling the cake, make sure each layer is even and the filling is spread uniformly. Uneven layers can cause the cake to lean or collapse. Use a serrated knife to cut the layers and a spatula to spread the filling evenly.
For more tips on healthy meal planning, check out this guide on balanced nutrition. It’s a great resource for making sure your meals, including desserts, are both delicious and nutritious.
Now that you’ve mastered the Strawberry Chocolate Delight, why not try one of our other amazing recipes? For a delightful variation, check out our Strawberry Cheesecake Delight.
FAQ
Can I use different types of berries in this recipe?
Absolutely! While the recipe calls for strawberries, you can use other berries like raspberries, blueberries, or even blackberries. Just make sure to chop them finely so they mix well with the filling.
What if I don’t have buttermilk?
No problem! You can make a quick buttermilk substitute by mixing 1 cup of milk with 2 tablespoons of lemon juice or white vinegar. Let it sit for 15 minutes to thicken. This homemade buttermilk works just as well in the recipe.
How do I know when the cake is done?
You can tell the cake is done when a toothpick inserted into the center comes out clean. Start checking at the 25-minute mark. If the toothpick comes out with a few crumbs, that’s okay; the cake should still be moist.
Can I freeze the cake?
Yes, you can freeze the cake for up to 2 months. Wrap each layer in plastic wrap and then in aluminum foil. Thaw the cake in the refrigerator before serving. This is a great way to prepare the cake ahead of time for a special occasion.
What kind of cocoa powder should I use?
For the best results, use unsweetened cocoa powder. Dutch-processed cocoa powder works well too and gives a richer, darker flavor. Avoid using hot cocoa mix, as it contains added sugars and won’t give the same depth of flavor.
Can I make this recipe dairy-free?
Yes, you can make this recipe dairy-free by using a plant-based milk for the buttermilk and substituting the butter with vegan margarine or coconut oil. The cake will still be moist and delicious, and the filling will be creamy and luscious.
How long does the cake last?
The cake will stay fresh for up to 5 days when stored in an airtight container in the refrigerator. Make sure to let it come to room temperature before serving for the best texture and flavor.
Can I make this cake gluten-free?
Absolutely! You can use a gluten-free flour blend in place of the regular flour. Just make sure to follow the recipe as written otherwise. The cake will still be moist and delicious, and the filling will complement the chocolate and strawberry flavors perfectly.
What is the best way to cut the cake into layers?
Use a sharp, serrated knife to cut the cake into layers. Move the knife back and forth in a sawing motion for a clean cut. You can also use a cake leveler for perfectly even layers. Take your time and move slowly to ensure the layers are even.
Can I add other flavors to the filling?
Yes, you can add different flavors to the filling. Consider adding a dash of cinnamon, a hint of orange zest, or a splash of vanilla extract. These additions can add a unique twist to the filling and make the cake even more flavorful.
Conclusion
The Strawberry Chocolate Delight is a magical dessert that brings joy to any occasion. With its rich, moist chocolate cake and luscious strawberry filling, it’s a treat that everyone will love. Whether you’re a seasoned baker or just starting out, this recipe is a winner. So, grab your apron, preheat the oven, and get ready to create a delicious masterpiece that will delight your loved ones. Happy baking!
Strawberry Chocolate Delight
Ingredients
Equipment
Method
- Preheat your oven to 350°F (180°C) and grease a cake mold with butter and parchment paper.
- Mix 1 cup of milk with the juice of 2 lemons in a small bowl and let it sit for about 15 minutes to thicken.
- In a large mixing bowl, sift together the flour, baking soda, salt, and cocoa powder.
- In another bowl, combine the eggs, oil, buttermilk, and vanilla essence, whisking until smooth.
- Add the dry ingredients to the wet ingredients in two batches, mixing gently with a spatula.
- Stir in the sugar until all ingredients are fully integrated.
- Pour the batter into the prepared cake mold and bake for 25 minutes or until a toothpick inserted comes out clean.
- Cool the cake in the mold for about 10 minutes, then demold and cool completely on a wire rack.
- Once cooled, cut the cake into 2 or 3 layers.
- Melt butter in a saucepan, add condensed milk and powdered milk, stirring to a smooth mixture, then add chopped strawberries.
- Assemble the cake by layering it with the filling.